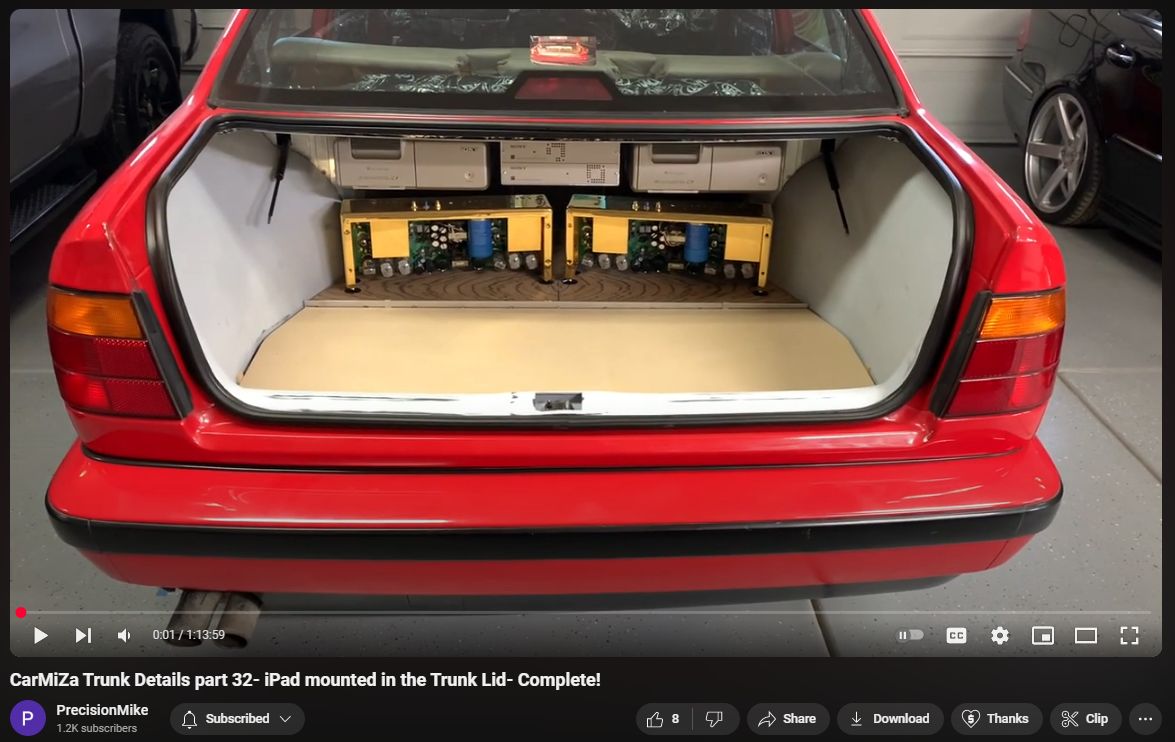
CarMiZa 32 Trunk Details iPad mounted in the Trunk Lid Complete
In this video, I complete the fabrication of the trunk lid panel. This is a long video, but there’s a lot of really cool tips and tricks. Will the struts hold the trunk open? Find out at the end! Thanks for watching and enjoy.
At this point: 1,497 hours into the entire build. 900 hours on just the trunk. On trunk lid 71 hours.
Can I just start by saying, again, that this is by far the most inspiring build I have followed in many years. Your reasoning and rationale around the build and keeping it old school really resonates with me and takes me back to the 90’s when all this was new to me. I think you have found a really good balance as well, the introduction of the iPad is “just enough” of more contemporary elements.
Transcript
0:01
hello and welcome back to the channel this is going to be Cara trunk details
0:06
part 32 uh by the way if you are following my channel for AMG content
0:12
there is a lot more of that coming soon as well I'm trying to get a little bit further ahead on the BMW car audio build
0:19
and then there will be some really cool videos on the amgs so uh more to come on
0:25
that um as far as this video goes I'm going to continue working on this uh
0:31
trunk panel for the iPad um the objective with this particular video
0:36
hopefully if all goes well we'll get it fully shaped primered and mounted to the
0:42
trunk lid for an actual test fit with the iPad and all of that that's going to be the goal uh one other quick thing I
0:48
wanted to convey too in terms of hours I've been talking with um good buddy of mine Joe in New York hope you're doing
0:53
well pal um I am coming up on I'm currently in terms of an hour count for
0:59
the this build, 1497 hours into the entire build 900 hours on just the trunk in this piece
1:07
I'm at 71 hours so far my goal is to be 100 hours or less on this panel but if
1:12
it goes over it goes over I want it to come out good so with that let's go ahead and get started back to work on
1:18
this panel all right these next few steps are not going to be super sexy so we'll try to get through them as quick as possible um the first thing I need to
1:25
do I'm going to work on the perimeter of this and um I did notice despite my best
1:31
efforts using the OEM piece as kind of my backing piece and all that um this
1:37
kind of pulled up a little bit maybe a quart of an inch away from the lid more than I want it to be so if you're not
1:43
aware uh with fiberglass you are able to kind of heat it up and reshape it a bit
1:49
so I'm going to hit it with a heat gun and get it warmed up and I'll show you basically I'll
1:56
marked marked my spots kind of where I need to go
2:04
I'll heat it up and I'm basically just going to apply pressure and just kind of
2:09
hold it while it
2:18
cools basically I'm going to get it all heated up that I'll hold it and then let
2:25
it cool so let me go ahead and do this and then I'll show you what the result looks like all right this is much better
2:31
I know I didn't show the before but my objective is to try to basically kind of Stay True to this line right here and it
2:37
was hanging off of that um pretty bad in some spots again I know this is super
2:43
rough but uh in this video this will become BL glass so all right on to the
2:49
next step okay next thing we're going to do is to fiberglass resin on the back side of the panel around the perimeter
2:55
um I've covered this on other videos but I've got a lot of new subscribers and uh people watch watching the content so if
3:01
you've not seen my other videos there's a whole bunch on my channel um here's what I do to mix up fiberglass resin I
3:07
don't have fancy mixing cups I'm doing things um kind of very frugally I would
3:13
say cheap tools all that so I save any kind of containers like this my wife makes uh you know pasta sauce I'll save
3:21
all the cans from that and I use those for resin um here what I've done is I
3:27
fill this with water measure out the I want in this case it's 6 oz that's a good handleable amount um manageable
3:35
you're not it's not too much not too small um I then pour this into here and
3:40
Mark where the water line is now I know I can pour up to this line with the resin and I've got my 6 oz and I'll mix
3:47
my drops in accordingly on the mekp the hardener um
3:52
very important again a good Pro tip is to be really careful with your drops it should be uh for each ounce it should be
3:59
14 drops of MEP that's at about 80° ambient um you want to adjust
4:04
accordingly the hotter it is the less MEP if it's cooler you want a bit more
4:10
so I'll probably do about it's about 64 65° right now so I'll probably do about
4:17
maybe 15 to 16 drops per ounce so hopefully that's helpful all right let me get this mixed up and I'll show you
4:23
what I'm doing another little Pro tip if you're using a similar kit to what I've got just the cheap Bondo brand uh
4:29
polyester resin comes with two tubes like this you need to poke a hole in there to be able to get the drops out
4:36
use something really fine like this type of a um you know safety pin type thing
4:42
with a really really small point that way you got really good control on the drops all right I just checked it's
4:48
actually 70° out so I went 15 drops uh per ounce so at this point what
4:55
I'm going to do is just go around and paint this Edge with resin again the
5:01
objective here is just to kind of seal it out um and offer up some additional
5:09
rigidity uh I also will once it's you know fiberglass
5:15
resin takes a while to fully cure I'll put it back on the trunk lid and bolt it
5:20
in place once it's not sticky anymore right once it's um curing up and that
5:27
will help to ensure that it mean maintains the correct shape this is that that fleece material that I added and
5:35
again I'm going to back paint this with resin just to really add some additional
5:40
strength you got to consider too like when I go to carpet this I'm using a an
5:45
it's technically an unbacked carpet it's not an ozite it's a really high-grade carpet um it technically has a backing
5:52
it's it's going to be really hard to work with I'll be fighting it like crazy using steam and all that so I need to
6:00
make sure that this is going to be tough and doesn't you know crack or bend or
6:05
fall apart when I go to do that so um also if you hear some background noise I've got one neighbor uh where I live
6:13
awesome guy uh and family uh and they are having a party uh today is actually
6:18
New Year's Day so happy New Year's to everyone um one other quick thing too while I'm painting this on I noticed um
6:27
was it yesterday yeah yesterday uh or the day before I forget recently I
6:33
posted a picture of when Earl came over he recently come over last couple of days um and he was in the area so he
6:42
texted me and said hey I'm around can I stop by and uh we you know chatted for a
6:49
little while he checked out the progress of the car and we took a picture and I put the picture up on Facebook and I got
6:56
a lot of really really good feedback um so I definitely appreciate it I think people really respect and appreciate the
7:03
old school rebuild and I think the fact that I'm I'm keeping this the car it's
7:09
basically going to be like it was back then only some very careful upgrades but
7:15
I'm not going to use any new equipment intentionally I wouldn't if I I've been offered stuff and I I don't want it um
7:22
old school to the Bone and uh I want to use the old school stuff this is what
7:27
got me into this this is why I'm I just turned 55 and I'm still doing this so I
7:33
don't want new stuff I don't want new speakers uh I don't even want the new
7:38
process so everything I'm doing here is is the way that I used to do it when I competed I used to have a shop um I
7:46
didn't do a ton of installing at the shop I would do the the really high-end stuff for the boat stuff with my guys
7:52
that were awesome um but again like this is the whole thing with this build is
8:01
Throwback uh it'll have a CD player it will not have you know the the two Sony Changers 10 dis Changers there will be
8:08
no streaming there will be no downloads you want to listen to it you got to listen to a CD just the way it
8:14
used to be so I think it's going to be really magical in that regard so all right I've got pretty much went through
8:21
my 6 ounces here and I've got this kind of this bottom section done
8:30
now I'll go mix up another batch and I'll do kind of this uh the back side here get that
8:37
ready again if I need to I can hit this with a heat gun just to cure it
8:42
up um and then I'll get it mounted back on the panel the actual trunk lid and
8:49
let it fully cure all right I got that front area all done or the bottom now
8:54
I'm going to do the back um and again one other thing I just want to reiterate I really really appreciate appreciate
8:59
all the support that people have given me um obviously there's a couple of people out there who may not like what
9:06
I'm doing or the way I'm doing it that's fine I respect that um everybody's entitled to their opinion um but the
9:13
majority you know virtually everyone has really thought that this is going to be an awesome build I wish it was going
9:19
faster trust me but I look at this as uh my last build this is going to be I'm
9:26
putting everything I got into this one so I don't want to skip anything Rush cut Corners whatever
9:33
so um the other thing too with regard to
9:39
you know new technology and all the the new stuff's better and all that or whatever I disagree with that personally
9:45
I think they don't make them like they used to especially with dacks and things like that um but the other thing too is
9:52
that in my job and in our everyday life technology is really really getting
9:59
crazy AI especially I use AI at work like all the time and it's awesome it's
10:07
helpful but I kind of I want to look back at the old school days so again I
10:13
think this this whole build is part of kind of rekindling that and um just keeping that alive you know
10:22
um this area too you can see where I'm doing this is the kind of the hollow areas where the the map was kind of thin
10:31
one of my next steps I'll do is knock this down with a sander and I need a little meat in there to be able to build
10:38
it back up so again this this back part where I did that
10:44
fiberglass uh mat I mean if I was to do it again would
10:51
I do the mat instead of fleece I don't know um kind of mixed opinion on it so
10:58
but uh his what it is and I'll work with it so all right let me get this finished up and I'll show you the
11:05
result all right so here's what it looks like the resin
11:10
is sticky but not liquid anymore um again it looks
11:17
kind of ugly back here but it'll look the whole thing will look really good when it's done I assure you you can see
11:22
where I've got I puddled in a bunch of resin in there uh one of the next things I'm going to do is sand this this area
11:29
down from the top and we'll really start to that's when it's really going to start to take shape and look much better
11:35
so all right next I'm going to I'll pop the piece onto the trunk lid and bolt it
11:42
into place give it maybe an hour or two just to cure up a bit more and then I'll continue working okay again I don't uh
11:49
expect there to be any issues but I mounted the panel to the trunk lid I'll let it cure up a bit longer before I go
11:54
to the next part all right it hasn't been super long but uh I want to try to keep working and it's getting cooler
12:02
obviously so I'm going to keep try to keep working here so once again if you're not aware I spend as much
12:09
time um working on planning um figuring things out order of
12:14
operations ordering parts all that as I do working in the car so again I kind of
12:20
lay out all my stuff I was up early this morning so my next step is going to be
12:25
to knock down the areas I need to for the perimeter so if you notice right
12:31
here I've got kind of a good consistent Gap this is again this is where the trunk gaskets going to go my carpet will
12:38
roll around here I want to allow enough room for the carpet um and I'm going to
12:43
probably keep it consistent with this Edge you know with this Gap so which is just about a quarter or so so at this
12:51
point I've got some areas that are uh not a quarter they're it's actually touching here uh so what I'm going to do
12:58
is pull the panel off go around with a sander and sand off this Edge as needed
13:04
so I'll go ahead and do that now all right here we
13:11
[Applause]
13:21
[Music]
13:26
go that's going to be the name of the game G I'll slowly work it until I get it just to right Gap all right quick
13:33
check in here I'm making some progress I'm just slowly working it and as you
13:39
can see there are areas that are kind of inconsistent just very slightly
13:45
inconsistent um like here for example I need to take out more as compared to there so what I do is just go around and
13:53
I'll mark the areas that I need to sand with a sharpie bring it back outside and just keep slowly working at it then I'll
13:59
sand away like this is one of my old lines I'll sand that away um and then
14:04
keep doing this until I get a consistent Gap here and I do have the screws in uh
14:09
just to make sure it's in the correct position all right quick check in on this uh it was light when I started it's
14:16
dark out so um my main focus right now is just getting the perimeter um nice and consistent nice
14:24
and smooth I'm going to I'm worried about right now high spots this is a low spot I'll fill this in but again my main
14:31
focus right now and it takes the you know a long time is taking care of the
14:39
high spots so if you look this is substantially cleaner and much better
14:45
than it was you can see I've got a little tiny bit of a gap here that again is intentional to allow for the carpet
14:51
to roll underneath so um I've got basically that whole perimeter part done
14:58
I still have to do this this front part so I'll do this next and again just knocking off the high
15:04
areas all right I am happy with the perimeter Gap that I have I've got my
15:10
gap for my carpet everything looks good good enough for now it's going to need some tweaking which is on my to-do list
15:16
which is fine so the next step is I'm going to knock down all the high spots on the entire panel in preparation for
15:24
filling it'll include things like these fiberglass resin runs and this giant
15:31
growth here all this stuff basically think of it again excuse me as I'm knocking down all the high spots and
15:38
then after that I'm going to start filling it and that's where it's really going to start to come to life so um
15:45
I'll do this the sanding off camera it's dark outside anyway uh it's not fun you've seen me sand before but even this
15:51
stuff I'm going to come in with a 2-in drum sander on a uh hand drill and
15:57
basically use that to help kind of shape this area I'll use be using a DA and the random orbal that I've been using so I
16:04
will go to it I'll get this whole thing sanded and I'll show you what it looks like when I'm
16:10
done all right I have my answer um if I was to do it again and I'm not uh I
16:15
wouldn't have used the fiberglass mat on the vertical part I would have used fleece um I have too many air pockets
16:22
Bubbles and stuff like that that I had to knock down now I've got hollow sections which isn't a big deal I still
16:28
have the underlayment of the factory piece I'll mud this up it'll be fine if you remember um earlier in this video I
16:36
poured a bunch of resin in here on both sides and that's why just so I had you
16:42
know it basically filled in this whole area this area I need to be really careful of because when the trunk is
16:48
closed it goes up against here and there's a bit of clearance but um I could probably fit my finger in there
16:55
but I'm going to have carpet on both pieces so I got to be very conscious of that it'll be something I'll test so
17:02
definitely she ugly right now really ugly um but I think I've got everything
17:08
knocked down all the high parts um and then tomorrow night I'll get back into
17:14
it and I'll start filling that's going to go I think it's going to go pretty quick um this stuff's easy to work with
17:21
this is the stuff I'll use um it is a short strand fiberglass um filler basic basically
17:29
like a thick heavy duty filler and it works wonders the stuff is awesome to work with um that said however Carl I
17:37
think you're on to something I bet if I was to put this thing in the car right now put the panels in and the iPad the
17:43
factory shocks might still be able to hold this up but by the time I do the
17:49
filler um I might use a can of that stuff um it's going to add more weight
17:55
and that might push me over the edge so if so whatever I'll just motorize it no biggie um and I've got some ideas on
18:02
that too so it might end up working out just fine so all right that's going to be it for tonight tomorrow we'll get
18:08
back into it and we'll get into filling and sanding and that's where it's really going to start to take shape all right
18:14
it's the next night it's fill night we're going to fill this thing in so
18:19
I've got my little work table set up outside here currently about 70° or so
18:26
uh I'm going to work for a few hours on this um hopefully be able to get the I'm
18:31
sure within a few hours I can get the general shape really dialed in um I'm not going to worry about the very fine
18:37
detail stuff so right now this step is going to be getting all this smoothed
18:43
out all these areas filled in this back piece will be the next thing I deal with I'm still kind of finalizing my plan on
18:50
that that'll be the next step after I do this kind of major fill and stuff so um
18:55
I'll go ahead and get started and I'm also going to try something that I've not done before uh which is timel Lapse
19:01
video of me doing this so uh hopefully this works out and let's give it a shot
19:07
[Music]
19:34
all right that was about an hour's worth of work and 30 seconds so uh hopefully you like that um if you did let me know
19:40
in the comments maybe I'll do more time lapse I think that's pretty cool I'm not much of a tech guy outside of work and
19:46
so I'd like to figure out more uh things like that to be able to show more content so uh if you noticed I did spray
19:53
a little bit of water um this stuff will get a little bit thick when it's cold out and the water seems to reduce the
19:59
viscosity a little bit um so now at this point I'll let this uh cure up I'll
20:04
probably hit it with a heat gun um it's getting cooler right now and then basically I'm going to sand it which
20:11
will include using my uh 5 in ta and I've got some uh little 3-in pads those
20:17
are all 40 grit I'll start out real aggressive with 40 grit and then I'll do another probably two more rounds around
20:24
the entire piece with the kitty hair just basically sanding filling sanding filling so on and so forth so I won't
20:31
bore you with all those details let me go ahead and do that and then I'll get it ready uh up to the point where I'm
20:36
ready to do this uh curve piece here all right here's my current progress um I
20:42
didn't spend a ton of time sanding uh I just did what you saw in terms of the filter and then I knocked that down and
20:48
sanded it and got rid of the high spots um definitely have more to go and I'll tell you I'm using that kitty hair that
20:54
short stranded fiberglass filler um and it's when I start working if it's in the
21:01
evening it might be 65 degrees out and then it gets down to about 60 and then I have to stop and the stuff is really
21:07
really thick uh over the summer when it's really hot here it's like toothpaste the viscosity is much much
21:13
thinner much easier to work with and I could I could have gotten this way better in way less time so I'm going to
21:20
give it some thought I might switch over to rigor body filler uh regular Bondo I don't like it because it tends to have
21:27
more Hood to crack later uh this stuff is just super super strong that's what I
21:32
did on like the side panels and those were like butter I mean doing those was a piece of cake um this is not it's not
21:40
going as good as I'd hoped so um it's not coming out bad it's just taking more
21:45
time than I had that I would hoped and would have thought but the overall look is starting to come together you can
21:51
kind of see it and imagine there's again I'll do the curve in here that'll be one of the next things I do so I'm going to
21:57
wrap it up for tonight my next thing to do is to apply you can see where i' I go through and I kind of identify areas
22:04
that are low quite a few of them and um tomorrow I'll hit it with either more of
22:09
the kitty hair or Bondo and I'll I might even come out during like a lunch break
22:14
and and slap some on there so I will see you tomorrow all right it is the next
22:20
night and I've decided to move inside it's um very low 70s maybe 72° outside
22:27
right now and and after last night fighting this filler with the kind of
22:33
again it's kind of a thicker consistency I decided to move inside I also forgot and I posted on a Facebook uh Auto Body
22:41
Forum you can use resin to thin this stuff down you guys have probably heard of Milkshakes where you basically mix
22:48
Bondo and resin and it gives you like a consistency of a milkshake it's a really good filler um I can use this same resin
22:57
in this stuff so that's what I'm going to do again I'm going to do this off camera because it's just busy work and
23:03
the objective is going to be to go and get this refill um just another layer and then I'll sand it and then hopefully
23:10
I'll return back to you when it's almost finished basically at that point all
23:15
right quick check in much better this is pre- sanding this is my second coat of kitty hair I did use the resin like I
23:22
said I would just a little bit if you're going to use resin to thin this stuff or Bondo um just remember you can always
23:29
add more you can't add less so be careful cuz a little bit goes a long way it made it a lot thinner um easier to
23:36
work with it flowed much better it was it's you can see it's going to require less sanding obviously the second coat's
23:42
going to require less sing than the first I still got some high spots that that'll knock right down with some 40 grid on a DA or on my uh random orbital
23:50
but starting to get there uh so next what I'll do is get this sanded and then
23:55
again this is basically think of this as where I'm trying to get this thing into the right shape symmetrical everything
24:01
is basically the right shape and um one of the last steps I'll do before primer
24:08
is to do kind of a final review of any little dimples things like that the carpet I'm using again it's got a
24:14
backing on it and the carpet's really thick I could probably carpet over it just the way it is and it would look the
24:19
same as it'll look when I'm done after I sand the heck out of this but I'm kind of a perfectionist that's the way I roll
24:25
so all right I'll go ahead get this sanded and I'll check back in just a bit all right sanding is underway big time
24:33
um this flat area I basically have almost
24:38
100% um I've got a few little things to do like a little tiny pinhole type things um notice too I
24:47
did carefully sand down where I had these painted but I went just past that just
24:54
again to maintain the Integrity of the thickness of the wood but uh um you can't really tell by by looking this
25:01
looks like it's rough or this it's smooth as glass I could probably paint this and put it up there and it would
25:08
look really good so um couple of things too what I do is I do a lot of this kind
25:15
of feeling for bumps and things like that I think you can feel a lot more than you can see and when I'm dealing
25:21
with something that's got a left on the right side I'll run one hand down either side and and be able to tell if it's
25:26
symmetrical or not so so again um few little things here and there but all in
25:31
all it's starting to look like something you can get a better idea notice also the way with the exception of this being
25:38
cut I left the fleece in here intentionally just to try to keep you know um fiberglass resin and stuff like
25:45
that from getting inside here especially compromising this uh you know the magnets and things like that so and I
25:51
kept it away from this Edge so now I've got some sing to do here and I'll do the
25:56
same thing and get this up the speed and then the next thing is going to be dealing with this kind of a curvature
26:02
here all right it's almost a week later it's been a little while since I've worked on the car been busy with work
26:08
other stuff and also my C32 uh decided to present some interesting issues uh so as you can see
26:16
I've got this kind up up on jack stands uh I'm doing tires new suspension that's
26:21
one of the issues with driving a car that's 22 years old so that hopefully
26:27
won't be too much of a distra so this evening I'm going to get back to work on this even though it's going to be really
26:32
pretty cold for Arizona cold in the 40s outside but I've got to get out there and do some work so um I'm going to be
26:38
working on kind of all the final stuff here before I work on the curvature and
26:43
there's a half dozen or so miscellaneous items I'm going to go ahead and knock those all out and I'll give you a brief
26:49
overview as to what those were and then uh we'll start working on this curve area all right I just knocked out a
26:55
bunch of miscellaneous items off camera uh so I got my little list here I'll show you what I did so the first thing I
27:01
did was I had to tweak this Edge it was not following this line um I would say
27:09
very precision and now it is I'm happy with it uh to to move this to adjust
27:15
this I just heated it up carefully with a heat gun from the back side and the front side which kind of made this a bit
27:20
pliable and I just had to move it eighth of an inch or so maybe maybe a quarter in a couple places but uh that was the
27:27
first thing the next thing I did was again I show you guys The Good the Bad the Ugly this was the screw hole for the
27:34
center screw I went off of this is I looked at this and said all right cool this is Center and then came down here
27:41
you might have saw that in I think one of the last videos so but uh if you recall from some of the other videos
27:48
this thing is not perfectly centered the center of the latch is technically the center of the trunk so I pulled the
27:55
insert out of the um trunk liet itself um dynamed that over and then drilled a
28:02
new hole and then did a new screw um you can also see that I counter sunk all of the screws I'll probably have to I'm I
28:09
will definitely have to tweak that and kind of um drill them back out slightly
28:14
after I do the primer um right now everything I'm doing is to prep for the primer I also put the trunk arms back in
28:21
and confirm they fit just to be safe um I also matched this this Edge right here
28:28
so I had did knock a decent amount down right here you can see there's a hole right here this is where the factory wiring goes into the trunk lid comes it
28:34
follows the trunk arm right here and then it kind of branches off and goes in here and this is a hollow almost like
28:41
tube if you will which I maintained um that'll still be the case but I think I'm going to build some caps that go
28:47
over the trunk arms um and then they'll kind of meet up right up to here what I basically needed to do was if you notice
28:54
on this one there is no wiring I wanted to maintain and mimic this same thing to make it symmetrical so that's what I did
29:01
so um this was kind of more pointed like this and I I sanded that down um the
29:07
next thing I did again counter sunk all the holes made sure the holes are are really good everything is solid there
29:13
and then I added for these screws when I counter sunk these again this is just e
29:18
inch Meson night to try to keep things light um and then the fiberglass over
29:23
the top of it so I added three what I call backing plates to these three and I'll show you that right now let me go
29:28
ahead and pull the lid off all right so these are the backing plates I added qu in MDF just CA glued it as you can see
29:35
like crazy to this panel just to give it a little bit more strength especially because that's where the screws will be
29:41
I did that one uh and that one there as well all right it's the next night and I
29:47
am going to next focus on knocking down this sanding down this area you see
29:53
obviously I've got some big spots I've got to knock down won't take me very long and I'm going to be doing it
29:58
outside where it's already dark so um no point in filming this part and you've
30:04
seen me saying before so I'll go ahead and get this going all right one quick thing I'll show you here I made a kind
30:10
of a jumbo sanding stick sanding stick basically just double-sided uh taped UH 60 grit
30:16
sandpaper in this case this way I can get this area real nice and flat all right there we go after about an hour or
30:22
so of sanding maybe just over an hour um General shape is there you can see that top area right there that was kind of
30:28
wavy before it's nice and flat I used that sanding stick that I showed you um this face here is there's an
30:35
intentionally a curve there I wanted a slight curve uh that's that's by Design but it is otherwise you know nice and
30:42
flat and smooth there's a few little obviously this area is a little rough we're going to deal with this when I do
30:47
the curve um and then there's some other small minor fill in areas I'm not sure if I talked about it I think I did I
30:54
screwed up yeah I screwed up where I put the Hole uh so I had to redo that so fill that in things like that that's
30:59
about as big of an error as there is right now so um that's going to wrap it up for tonight I'm going to it's Friday
31:05
night uh I've got to deal with some stuff on the C32 I got some new suspension parts today uh I got new
31:12
tires all that kind of stuff so I've got some stuff to do on that but I should be able to come back and spend a decent
31:18
amount of time on Misa and get this thing closer to getting it into primer all right it is Sunday afternoon and I
31:25
got the C32 back together everything's good there focusing on Misa the next thing I'm going to work on is this latch
31:31
area uh you may have noticed this throughout the working on this it looks horrible um but I've got a solution for
31:38
this so let me show you what I'm going to do we'll get this mocked up all right starting up with a little uh drawing diagram as to what I'm going to build
31:45
all right from the drawing did a little cardboard mockup as I normally do um notice there's a bunch of little fill in
31:51
pieces this is where I do the tweak work um instead of having to do it out of
31:57
wood so this is going to go in like this these little uh holes represent where
32:03
the bolts are going to be cuz I'm going to drill through and this is actually going to sit where the heads of the
32:09
bolts go right through this you'll see why in just a bit if you know me by now you know I'm
32:14
very frugal and I keep everything and reuse stuff this is the original template that I used for the aluminum
32:20
bottoms that I built for the zapco amplifiers but for now it's going to be used to create this piece that of uh
32:27
quinch MDF from drawing to mockup to final piece so got it all put
32:35
together CA glued it all together really good and strong show you what it looks like
32:42
here goes in obviously I got to get it placed properly but that's the idea the
32:47
reason I need to have sorry the reason I need to have this as low as possible is
32:53
um I don't have a ton of clearance between this and the this rail here again in the trunk so I
33:01
need to be really careful to make sure that I try to keep this thing as tight as possible so now what I'll do take my
33:08
big panel that I made show you over here and I knew I'm sure some of you are
33:14
looking at this like wow this looks like crap it looks horrible I'm going to just cut this thing out I'll take this I'll
33:22
in install it here I'll CA glue it into place and then I will I'm going to I went B on this side um and I'll end up
33:30
having to knock this down because of the curvature here um I wanted to make sure
33:35
I had plenty of meat so I'll go ahead get this cut I'll cut this with um either an airsa or a Dremel probably a
33:41
Dremel with a cut off wheel CA glue this into place and then get this sanded down
33:48
and then get this filled in and all sanded and like it never happened all right here just going to show you got
33:54
the main panel marked I'll go ahead and get it cut all right rough cut with an airsa you can see I left maybe a 16th or
34:00
so on either side now I'll sand it uh just put this VA a 40 grit just to kind
34:06
of sneak up on it and make it a nice tght all right pretty good so far now it's just a matter of uh working it in
34:12
there I took this piece of uh 16th in Aluminum stock bent it to the curvature
34:17
that I have on the panel and then use that to create a line to know where to
34:22
knock this down too now I'll just keep working it and whittling it in until I get it to fit properly all right gotch
34:28
you kind of a weird angle I have it just press fitted in now now I can lift it off make sure this is going to work I
34:36
want a nice tight fit there and looks good so now I'll CA glue it into place
34:42
and then start to sand it get some kitty hair in here and get the whole thing filled out and get it ready to move on
34:48
to the next part one other quick explanation if you're wondering what's going to happen with these holes they're
34:54
going to stay there I'm going to carpet right over the top of these and then I'm going to cut this hole here you won't
35:00
notice this at all just again allows for clearance for these bolts all right you can see where I need to fill in there
35:06
but more importantly notice how nice and level and flat that is with the rest of the panel so what I do in something like
35:11
this sand down the high spots notice I got this back curve really nice uh now
35:17
I'll just fill this in this is the only area that's going to need fill the rest of this is is good to go so I'm go ah
35:23
and get that filled okay latch area complete I will do some fin filling and sanding before I primer this which will
35:30
be one of the last steps the next thing I'm going to do with this complete I'm going to do the same kind of a thing but
35:35
I'm going to do it for what are called the I call them the bumpers they're basically the adjustable little uh
35:41
cushions that allow you to adjust the height of the trunk lid on either side you can kind of see there's the original
35:48
hole for one of these so I'll do the same thing section this area out um put a piece of wood in there um Quin MDF do
35:56
the same thing have a hole full for it um and get it set up properly trying to mold this and fill this is just going to
36:03
be a nightmare so I'll just section it out same way I did with this very happy with the way this came out uh I think
36:09
that'll be really solid so all right here we go all right bumper inlays complete came out really
36:16
nice same kind of a thing I had to drill I drilled the hole at an angle and then carefully opened it up by hand with a
36:23
file I didn't have a large enough drill bit to be able to Comm at an angle but came out really good I'm able to take
36:30
the panel on and off even with everything there I did go ahead and open up this Edge as well um you can see
36:37
where my original line was so I just us use uh a sanding stick and open that up
36:43
a little bit once I put this bolt in and kind of draw it tight um it was hitting here and I didn't like the way that
36:49
looked so um that will be it for tonight and I'm going to check and see how long
36:54
this video is I really want to try to get this thing there's we got to do this area the curve I have an idea for that
37:02
the final fill-ins and then prep for primer I'm also going to do kind of a
37:09
test final test fit of these three pieces and then primer it and then mount
37:14
it to the car and test it so I'm really hoping I can get all of that into this video um let's see how things go so
37:21
that'll be it for tonight and I'll be down here probably tomorrow if not the next night I we'll see you shortly all
37:27
right all right it is a couple of nights later uh one of the biggest things I'm dealing with right now is temperatures
37:32
uh believe it or not in Arizona it has been cold for us it was in the mid-20s this morning and during the day only
37:39
mid-50s to low 60s so trying to do fiberglass resin Kitty hair all that
37:45
kind of stuff is difficult when the temps are that low so I'm going to keep working here and we'll see what we can
37:50
done the next thing I need to work on is this area I knew all along when I built this that somehow I was going to do some
37:58
kind of a curve here um it needs to be curved but also this panel as you can
38:03
see from the top has a slight bow in it that is again intentional so how am I
38:08
going to do the curve here is my idea and I'm going to go out on a limb here and hope it works a shipping tube again
38:16
kind of old school creativity there's probably some new jig that'll do this or 3D print or curve or whatever um keeping
38:24
this whole thing old school so I've got a heavy duty shipping tube tube here it's 3in diameter which will basically
38:31
get the curve right to where ideally maybe to this Edge would be cool uh so
38:37
I'm going to try this so I'm going to see if this will work uh the length is perfect uh what I'm going to do is run
38:42
it through the table saw and cut basically a 90° portion of this and see how it goes so could fail and may have
38:49
to do something I don't like MDF but let's give it a shot see how it works
38:54
[Music]
39:55
all right I'd say that worked out pretty slick um a little sketchy I don't know why I was so sketched out cutting it
40:01
with a table saw but uh I've routered aluminum at this point and I was for
40:06
some reason you can't see the blade so that's a little weird all right let's see what it looks like and I also I
40:13
wasn't sure with the stiffness of this thing how hard it was going to be to bend it but that's going to be great I
40:20
think what I'll do I'll probably just CA glue it into place and then I'll fiberglass resin this just to give me a
40:27
a base and then Kitty hair this Edge and get everything cleaned up and then I can tie it into the here and I think we'll
40:33
be good so let me go ahead and get it ca glued into place all right the curve is CA glued into place I don't know about
40:38
you but I freaking love it it's exactly what I want it's light it's going to hold shape I'll resin over the top of it
40:45
and I could fill it in along the edges and we'll be good to go um all due respect to all the new installers out
40:52
there with you know fancy 3D printing and um all these crazy Jigs and all of
40:59
that this is again the Mystique of part of this rebuild I think is that I am
41:04
going back in time and even using old school techniques like to use a shipping
41:10
tube to create a curve I think is um kind of represents the degree of creativity we had to have back in the
41:17
day because we didn't have these fancy tools and things like that and again I'm just doing this with basic Tools in my garage so all right let me get some
41:24
resin painted on here and we'll go to the next step
41:56
for
42:26
for
42:56
for for
43:50
all right I am super happy with the way this is coming out so I applied my resin and as you saw I put it on pretty heavy
43:57
it was pretty cool when I first started it's was like 50 whatever 56 58° I also
44:03
while while it was curing I held up the trunk lid like this just to make sure I
44:09
didn't have it all run down this way um and then hit it with a heat gun to cure
44:14
and that was 10 minutes ago so now we're we're tacky it's not sticking to me it's not transferring so as you can see it's
44:21
built up real nice nice and strong and very light so at this point
44:27
I'm really close folks to being able to get this thing primered and back on the car so my next thing is going to be to
44:33
do the final fill-ins so this is going to be taking care of little Hollow Pockets like this obviously addressing
44:40
all of this getting all this mudded in it's just I use again Kitty hair for this which is a short strand fiberglass
44:47
reinforced filler I'll apply it I'll sand it I'll keep doing that um I need a minimum 45° for that and also I do use a
44:55
little bit of heat with a heat gun just to heat it up um to that point here's a funny for you guys if you remember I
45:01
left the fleece on this this goes way back when I initially wrapped this whole thing in fleece I left it on here just
45:06
to minimize like fiberglass drips and things like that I was over here with the heat gun I didn't video this part
45:13
and I'm I'm hitting with the heat gun to cure this and I've got these giant magnets in here for the iPad and the
45:20
heat gun got stuck here for just a split second while it was on sitting on the
45:26
fleece so he can imagine that could have ended pretty bad so funny things will happen like that so all right I'm going
45:32
to get to filling this part is not very glamorous but uh I'll check in with you in just a bit all right for this part
45:37
filling and sanding I'm going to try to do another time lapse um let me know in the comments if you guys don't like this
45:43
if you like it I think it's kind of cool um this way you get to see everything I'm doing as a reminder I am going to
45:48
fill in these holes up here for this latch I decided they're really not needed um and I just I don't want to
45:56
take any risks with with you being able to see an indentation with the carpet so with that let me go ahead and get the
46:01
time lapse going and uh it's time to sand and fill and fill and sand
46:26
[Music] right what do you think of the time lapse stuff hopefully that's pretty cool
46:33
you get a better appreciation I think of uh what this kind of a build goes through um all right so a couple of
46:40
quick things I'm not done yet I would consider that kind of my first heavy round one um there are still this area
46:46
is kind of my challenge area I still need to shape this a bit more uh but generally speaking this is is really
46:53
really close this bottom Edge I say is probably good enough for primer this top
46:59
Edge I'm going to skim coat this just a little tiny bit I've got some some gaps there I'll also go around the entire
47:05
panel if you notice too as I was working with the kitty hair if I had some extra
47:10
I filled it in but I still have some other areas that I need to go in and just fill in just a little bit but we're
47:17
getting there it's getting a heck of a lot closer and again I don't know about you let me get back here where you can see more of kind of like a idea of that
47:25
curve the curve basically the radius mimics what I've got going on up here as
47:30
well so I think it just all kind of flows and looks like it was meant to be so very happy with
47:36
it um and so what I'm going to do at this point I got to run inside and do some things and then I'll probably come
47:42
back out tonight assuming it's warm enough and do another layer of kitty hair it's going to get substantially
47:48
thinner it's just fill in spots spot sand it and then um finish this part of
47:53
it up so um I'll go ahead and do that and I'll check with you either it's going to be either later tonight or
47:59
tomorrow but I'll continue working all right it is the next night and I am out
48:04
here in the garage so um obviously sanding in the garage causes quite a big
48:10
mess um and it's a little bit warmer out today so I'm going to be able to start the Bondo and kitty hair out here this
48:17
evening and then as it gets cooler I'm actually going to bring the stuff outside to sand and then bring it inside
48:24
the garage uh to apply you know any kind of filler I'll go through the front door so I can keep the garage doors shut and
48:30
that'll keep a little bit of warmth in there and make sure I'm up the temperature um again as we looked at
48:35
just a moment ago for you it was a day ago yesterday for me um I've got some
48:40
areas to fill in here this is just more of what you just saw in the timelapse video so more Kitty hair I'll probably
48:47
do a round of Bondo or two just to get little tiny holes this stuff again folks
48:52
I could probably I'm probably more than fine with the way it is right now considering the the fact that I'm using
48:58
like a backed carpit so but I'm kind of a perfectionist so all right with that I'm going to go ahead and do some more
49:05
filling and sanding all right getting closer uh as you can see curve came out
49:11
awesome this I think really it's tough to tell to see by looking at it but it
49:17
really came out nice and I think the whole shape looks really really cool um there are some what I'm calling kind of
49:23
hollow Pockets here still I'm going to take my Dremel and just kind of chew into this a little bit and then fill
49:29
these in I got another one over here no big deal not the end of the world um and
49:35
it'll still be super strong and all that but other than that and I've got you know just some pinhole type small I'm
49:41
down to those types of fillings now at this point so I'll probably hit that with Bondo see a few here I'll do that
49:48
uh probably to uh definitely tomorrow night I'm again fighting the temperatures it's 30 something degrees
49:55
out uh outside right now so not a whole lot of fun to go out there and sand in the driveway when it's that cold so good
50:02
progress for tonight and I'll hit it again tomorrow all right it is the next night uh don't mind the noise my
50:08
neighbor is having some construction done at his house um I am fighting once again temperatures so I decided I wanted
50:16
to fill in this area just a little bit more I did that on both sides um did a few miscellaneous fillings here or there
50:24
um so next thing I'm going to do I'm actually to the point now where I can cut this fleece out so I'll cut this all
50:29
out I'm going to pull the magnets and I'm going to spray paint inside of this and on the back side so go ahead and get
50:35
started with that okay while I let that kitty hair cure up I cut away the fleece
50:40
next thing I'll do is remove all the magnets in preparation to paint inside this area okay got all the magnets
50:47
removed and washers and screws and I've got some masking paper here on my uh
50:53
table I like to paint things and kind of finish things off even if you're not going to see them um just to me if I
51:00
just paint it all black it just kind of finishes it so I'm going to do the insides of these pockets and the backs
51:07
side all right my awesome paint job is complete that's a joke it's not awesome
51:13
it's just making it somewhat consistent and look somewhat kind of finished off
51:20
um so I did that part I'll flip it over I'll show you the inside all right and that's what it looks like inside the
51:26
tray is again just a little bit more finished off um with that time to move on to the next
51:33
part which I'm going to check my list I think it's basically just knocking down these parts and then doing kind of a
51:38
final skim coat of Bondo on any small pinhole areas all right sanding
51:44
complete um not bad it did not go terribly bad
51:51
um okay one quick thing I want to mention um I am basically ready for
51:57
primer in terms of the piece um there are some small imperfection still little
52:02
pin holes if I was going to paint this which is you know possible at this point
52:07
if I wanted to kind of take this to the next stage and paint it like old school fiberglass kind of a thing I would fill
52:14
the pin holes with Bondo knock down to a um you know a higher grit sandpaper I
52:20
did everything that you saw in terms of the sing I did I did with uh 40 grit and
52:25
then I did one I didn't show that I basically went around the entire panel um with 60 grit just by hand um so it's
52:33
not I mean there's there's you know there's some there's some texture
52:39
on it still when I do this buildup primer it's a two-part um basically a polyester resin
52:47
primer or a polyester primer um that will fill it in it's basically a high Build primer uh similar to like slick
52:54
sand um if you've used that before it's going to that going to be that kind of a product so I Know Rich my buddy back in
53:00
New York loves slick sand I still remember you hated slick sand so um hope you're doing well pal good to see you
53:07
when I was back in New York um so that'll be the next step and what I
53:12
basically need to do at this point is go through my little to-do list figure out what I'm going to do I know one thing I'll do is reinstall the magnets I might
53:19
play around with the washers to get the depth of the panels where I want again those are just mockups I'm going to tape
53:25
those off um and then those will serve as masking for this inside Area when I go to primer the whole thing so um I
53:32
might get a little tiny bit of overspray in there and now the end of the world but um again I just like this to look a
53:38
little bit more finish off than just a a regular wood so all right with that I'm going to go ahead and go through my
53:44
little to-do list get this prepped it's currently Thursday night um and I will
53:50
again the temperatures are killing me so I'm going to have to wait until Saturday afternoon to shoot the primer um
53:56
probably later in the day I should be totally fine handling the panel and then
54:02
either Saturday night or Sunday we will Mount this thing on the car that'll
54:07
conclude this video and hopefully with any Lu those gas shocks are going to hold up uh if not we're doing some
54:14
motorization and we'll get to that as well so I think that might actually be really cool so all right with that I'm
54:20
going to go ahead and get this thing prepped uh and I will check in with you when we are getting ready to shoot
54:26
primer I'm just cleaning up the garage and uh I showed these before but I just want to reiterate these really came in handy so
54:32
I make sanding sticks and all they are is a piece of straight flat wood this
54:38
case they're MDF and a double- side tape sanding paper sandpaper and then this
54:43
will allow me to do things like I got that edge really good uh also even on things like this this Edge although it's
54:50
pretty straight and then I made a curved one out of a scrap piece of the tube that I used to do this curve um double
54:58
side taped it again and this was really helpful especially like in this area to kind of get this to continue it really
55:05
made a big difference and gave me a really nice result and allowed me to work pretty quick so figured I'd share that all
55:12
right it is Saturday it is marginally warm enough to primer so I'm going to get to work I've got a little bit of
55:17
prep work to do I'll go ahead and get that started and we'll move on to primer
55:23
all right the next thing I did just a moment ago is I mounted the magnets back in but in doing so um I removed some of
55:29
the washers so if you've been watching this series I intentionally have a stack of washers here um I obviously could
55:37
have built this where I didn't need the washers but I wanted those because it allows me to control the height of this panel in this instance what I'm doing is
55:45
um dropping the panel down a little bit I've decided not to use the mockup pieces that I'm going to be using I'll
55:50
use some card stock so I'm going to cut the card stock now and attach that and I'll show you how that goes I call this
55:57
card stock it's basically like poster board uh I get it at Dollar Tree for 50 cents for a big sheet I used my mockup
56:04
pieces as my template made sure I had a nice sharp blade in there and then that gives me a nice precise cutout which
56:12
I'll now insert into the P next I added a little piece of double-side tape to each of the magnets to help hold these
56:18
cardboard templates in place okay the three pieces are installed again these are just simply masking and I do if you
56:25
notice I intentionally want to get primer on this Edge I've got a little tiny bit of tweaking I want to do here
56:31
and there and the filler primer will allow me to do that so from here I'll go on to the next step all right one other
56:37
quick thing I'm doing is just taping off these holes uh just in the back side again I do expect there to be some
56:43
overspray but uh just trying to minimize that onto the beautiful black surface that I've got back here you can see it's
56:49
all patchy but again I can't stand things looking unfinished all right
56:54
continuing with the primary prep this is the gun I'm going to be using you probably see me use this before if you've been following my series it is
57:01
like 29 bucks uh full price without a coupon from Harbor Freight this is the
57:06
gun it's got a regulator mine's busted I didn't care to swap out the regulator I
57:11
I can use this one it's fine um and I also use this water absorption device that they sell um if you buy one of
57:18
these what I would suggest I run some reducer through it uh so this is the reducer um just to get any of the oils
57:25
or greases out of there um and also it allows you to set up the flow and uh get
57:30
your fan pattern and all that set up all right if you're interested I'll show you a couple of the gun settings um this is
57:36
the product I basically make sure I've got enough product coming out but not too much I don't want any runs this is
57:42
going to be the fan adjustment I normally open this up all the way and then just close it down just a touch and
57:48
then this is going to be the pressure coming in from the compressor I normally have it where when I'm pulling the
57:53
trigger I'm between 50 and 60 p SII uh on this so to give you an
58:00
idea this is still just my reducer but that's basically the flow that I'm after it's got a 1.4 mm tip so it works really
58:07
good for primer all right again if you've been following me you've seen me show this product this is speed coat
58:12
primer it's probably the cheapest stuff you can get off Amazon I think it's maybe 100 bucks or less for a gallon
58:18
it's a two-part activator um I had some runs on here so you can't really read it but um there's the product code if
58:24
you're interested in the model um it is a high build uh primer so it is going to definitely fill in some of the
58:31
imperfections but again I do not expect this to come out looking like a car um
58:36
the objective for this is just all keep you know keep it uniform and have it all one color um it is completely Overkill a
58:42
primer this but that's the way I roll so all right I'm going to get this mixed up and bring this out into the driveway uh
58:48
I use a vice to hold my gun like this and then we'll get to spraying it um one other quick thing too you saw me just
58:54
use the reducer for the first time time when I get a gun after subsequent uses I don't keep these very long because
59:00
they're so cheap you'll spend more on reducer than you do on a new gun if you clean it too much um but in between
59:07
those cleanings I'll I'll and when I've got to go back in and test all my settings I just use water just put water
59:12
in it blow through it it's it's a similar viscosity to paint and then make sure it's good and dry and then run your
59:19
paint through it all right at this point I'm all set up I got my daughter's car way out of the way uh my cars are in the
59:25
garage obviously including Misa wife's not here today so that works and we are
59:30
all set so I'm going to mix up the primer and turn the camera on and we'll go ahead and get shooting the primer
1:01:42
all right remember when I said it's not going to be perfect this is just to put an even coat on it um this is just a
1:01:48
preliminary really kind of a dust coat just the initial coat and this will also allow me to identify if there are any
1:01:56
areas that I might have missed from a sanding perspective and we're being scrutinized out here in this Zone and
1:02:01
you can see I think that the curvature and everything looks really good so now I'll do another couple of um kind of
1:02:08
heavier coats and then a final dust coat I'll let it here and then I'll be able to just give it a lightsand and again
1:02:14
I'm just going to kind of look like the side panels you might see some exposed stuff still not the end of the world so
1:02:20
all right I'll get going on the rest of this
1:04:41
is
1:05:05
okay here we are after the second coat again not perfect but um kind of getting an idea you know what the thing's going
1:05:11
to look like especi especially once it's upholstered I'm going to do one last coat um which I will add some reducer to
1:05:18
which will thin it out and kind of allow it to fill in a little bit better on some of these areas you can see sanding
1:05:24
marks and stuff um once it fully cures like tomorrow I will just scuff it with
1:05:30
some sandpaper again and it end up looking like the side panels but certainly well enough uh to upholster
1:05:37
with carpet
1:07:36
okay right now I've got the panel just sitting out in the sun and enjoying some of that UV goodness uh to try to just
1:07:43
make sure that the primer cures up really nice uh it's about 63° and it's 3:00 so in another hour or so I'll bring
1:07:51
it inside let it cure overnight and then I'll do the final sanding but look at the look at that inside curve this is
1:07:59
really as discriminating as you're going to get when it's out here in the sun it's effectively painted right now uh
1:08:04
granted it's primered but um in terms of being able to see the lines and the
1:08:10
curves and all of that I think uh I think it came out really nice I'm really happy with it hopefully we'll see if the
1:08:16
trunk shocks are going to hold it up uh that's going to be tomorrow so that's we are really close to to that point where
1:08:23
we're able to test it so that be it for today and I will see you tomorrow all right it's the next day before you get
1:08:31
ahead of yourself it's not up on its own power right now I put a couple of vice grips on the shocks cuz I literally just
1:08:38
mounted the panel um just to make sure that the panel stays up there so sanding
1:08:44
is done um as I told you there will be like some visible little stuff here and
1:08:49
there but nothing that the carpet won't cover um really really cool um to see
1:08:56
this in person I think looks awesome the curves really kind of maintains the
1:09:01
lines of all the curves that I've got in there so at this point what I'm going to do is set up the camera on the tripod
1:09:08
carefully remove the flight scripts and let's see if this thing comes slamming down or if
1:09:15
it stays open if it does I've already done some research there are other shocks that I can get um that are
1:09:23
stronger or again there is the possib ility of motorizing it so let me get the tripod and we'll give this a shot all
1:09:29
right if this does work we're not 1,000% in the woods yet because I still have the weight of the iPad and the other two
1:09:35
little panels which are really minor so okay here we
1:09:40
go there are two of these there is
1:09:53
one very difficult to do one handed
1:10:01
and legit this is the first time I'm doing this
1:10:07
okay it's staying up that's
1:10:12
progress feels like there's quite a bit of resistance still going down a lot of it has to do with the physics of the you
1:10:19
know it's a giant pendulum as well
1:10:26
I think I might be all right what do you think you guys still
1:10:31
think I should motorize this given a choice I think it would be cooler to motorize the what I call the pole floor
1:10:39
that'll cover the spare tire because when I'm at shows and stuff I'm just going to open this and leave it
1:10:46
open all right awesome that made my day not going to lie uh all right let me
1:10:52
pause this for a sec all right I'm still like shaking um all right I have another
1:10:58
test to do this is there's a series of tests I'm running now on this so the next test is going to be I'm going to
1:11:03
get in the trunk um and make sure that I've got clearance if you remember this
1:11:09
area was really kind of sketchy and suspect I did raise this part up around
1:11:14
the latch cover which I think I might undo which isn't going to be that much work if so I won't even show that on
1:11:19
camera I'll just deal with that on my own so all right let me go ahead and crawl in the trunk and see how this goes
1:11:25
okay that part went good there's enough clearance but I've got to do some tweaking I think on the latch alignment
1:11:31
because I wasn't able to kind of push down on the trunk while I'm in there so I'll consider that a pass for now and
1:11:36
that'll just probably take some latch adjustment next thing is grabbing the iPad and putting the other two mockup
1:11:43
panels in which will except for the carpet represent the final weight so let me go grab those and we'll get those in
1:11:49
iPad installed and those two mockup panels um now you can get a better idea
1:11:54
of everything everything and the setup so I am super
1:12:01
happy guys and gals with this um really really nice I'm proud of it I love the
1:12:08
curves I love the way it flows it's super clean and again our the carpet's going to come right up to this Edge so
1:12:15
that'll these pieces will be flushed with a carpet um carpet's going to go over the hardware again and there'll be
1:12:21
a little cutout area where I can access the screws got the iPad plan I'll tell
1:12:26
you if I walked you know walking around a car show and I I walked past the car
1:12:32
and saw this I would definitely walk up and check this out never mind the fender opening up and all that stuff um that's
1:12:39
just you know gravy on top but I don't know about you guys I've never seen an iPad in a
1:12:46
vehicle um especially documenting the entire build of that vehicle how cool is that so um when I set this up it's going
1:12:53
to be kind of self-served there will be categories and you'll be able to you know click on like Dynamat and all that
1:12:59
and all the videos will show up so that's that's the purpose of all this and what I'm doing so um one of the
1:13:05
reasons one of the purposes but um so with that this has been and I super
1:13:11
apologize I'm trying to keep the videos to an hour or less and I know this one is over an hour so I apologize for that
1:13:17
I screwed up uh going into my program that I use and I thought it was going to be shorter it's not I think it's over an
1:13:24
hour so um one other quick thing I uh was hoping to get the panel done in 100
1:13:31
hours or less and it ended up being 109 hours so far still a lot more to do with
1:13:36
you know doing these panels and all that but just generally speaking the the fabrication and building of this uh with
1:13:43
the level of quality I think it came out at I am good with that so that will wrap
1:13:49
this video up uh if you have not yet already please like And subscribe and I
1:13:55
we'll see you very soon for another am video thanks very much take care