CarMiZa 28 Old School Car Audio Rebuild Trunk Details
The blog post titled “CarMiZa 28 Old School Car Audio Rebuild Trunk Details,” published on November 5, 2024, by Michael, documents the meticulous process of refining the trunk area of the CarMiZa project—a restoration of Earl Zausmer’s renowned BMW car audio system.
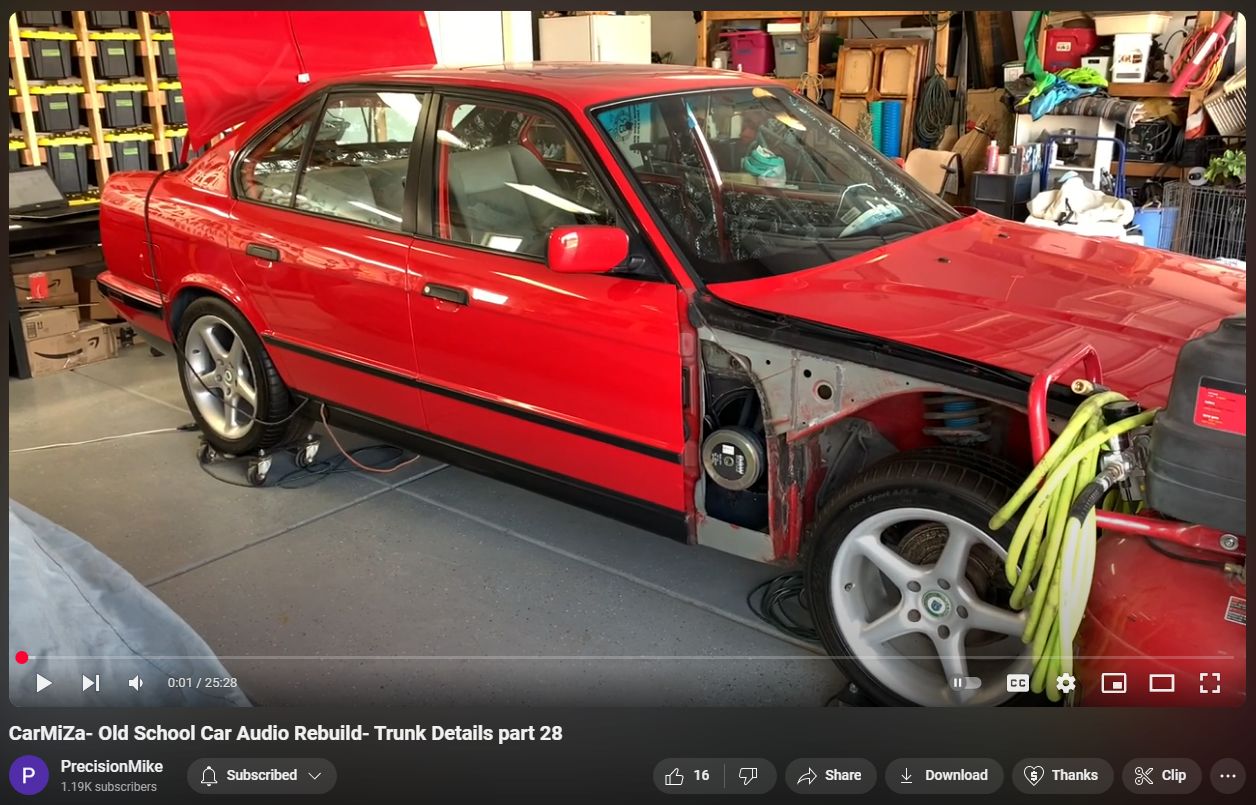
In this installment, Mike Michne focuses on enhancing the trunk latch area and preparing the near wall and side panels for upholstery. He emphasizes the importance of a clean appearance and addresses challenges such as exposed bolts and the integration of trunk lid bumpers. To achieve a seamless finish, Mike employs techniques like creating custom covers using ABS plastic, securing components with CA glue, and applying high-build primer to ensure a smooth surface for upholstery.
This post is part of a comprehensive series detailing the restoration of the CarMiZa BMW, which is the third iteration of Earl Zausmer’s legendary red BMW. The project is a collaboration between Mike Michne, former owner of Precision Autosound in Albany, New York, and Earl Zausmer, the original owner. The series provides in-depth insights into the challenges and solutions encountered during the rebuild, offering valuable knowledge for car audio enthusiasts and professionals alike.
“This is documented proof of explaining to customers … that installs are not an ‘overnight’ thing.”
Transcript
0:01
hey how's it going welcome back to the
0:03
channel and welcome to trunk details for
0:06
Cara uh number 28 um if you are new to
0:10
the channel uh and you may be here for
0:12
some of the other content on the other
0:13
cars I've got uh this thing is really my
0:16
main project it is a rebuild of a
0:18
legendary old school car audio system
0:20
that was owned by Earl zmer um this car
0:24
was featured in countless magazines
0:26
here's one of them um and is really
0:30
truly a legendary car when it comes to
0:31
the world of car audio so as you can see
0:34
it's got 13-in woofers in the front kick
0:37
panels uh I am very much under
0:39
construction you can see the interior is
0:41
very heavily dynamed uh the car is very
0:44
solid so check out the rest of the
0:46
channel I do have several other videos
0:48
on this car in this video we're going to
0:52
be working on the trunk uh as you might
0:54
imagine with the title and basically I'm
0:57
going to finish off this latch area and
0:59
finish off the near wall and the side
1:02
panels uh to get those prepared for
1:05
upholstery so with that let's go ahead
1:07
and get started okay so the main thing
1:10
I'm going to be doing in this video this
1:11
should be a relatively short video is
1:13
trying to clean this area up I don't
1:15
like the way it looks I don't like
1:17
obviously the exposed bolts um I did
1:19
come in here and grind down a little bit
1:21
of this I wanted to make sure that uh I
1:25
am now confident what I'm going to be
1:26
doing I needed to get it so that this
1:29
was flat across uh this will be
1:32
refinished this entire bracket we'll
1:34
talk more about that later this thing
1:36
has been driving me absolutely nuts in
1:38
terms of how to finish this off I um
1:41
sorry Earl I was driving him nuts calls
1:45
uh Facetime videos walking through how
1:47
to do this my biggest concern was making
1:49
this look clean and I also have the I'm
1:52
calling them the trunk lid bumpers I'm
1:54
sure there's a better name for them but
1:56
the adjustment tabs that basically
1:58
ensure that you've got a proper height
2:00
between the body of the car and the
2:01
trunk lid I need those and I didn't want
2:05
to have or I don't want to have it where
2:07
those things are sitting on the carpet
2:10
and they basically do an indentation
2:12
into the carpet I've seen installs with
2:14
that and to me it looks like you kind of
2:16
missed something um so later I've got a
2:20
cool idea I'll deal with that later when
2:21
I'm doing the trunk lid um this is going
2:24
to be completely redone iPad in here and
2:26
all of that but I've got a cool solution
2:28
for those later the main thing I need to
2:31
work on right now is getting these this
2:33
panel finished off and getting this area
2:35
complete so again I've got a plan and
2:37
for those of you who have been uh
2:39
following this build um again I realize
2:42
it's been quite a while since I have
2:44
shown you much content I've had a bunch
2:46
of things come up did some work on my
2:48
other cars and again if you're here for
2:50
the Mercedes content I hopefully you'll
2:52
enjoy this as well so first thing we're
2:54
going to do here is I've got a plan um
2:58
I'll go ahead and mock up what I'm going
3:00
to do I'm going to be building a cover
3:01
for this I'm going to mock it up out of
3:03
cardboard just to make sure all of my
3:05
cuts are good everything fits so let's
3:07
go ahead and dive into that all right
3:08
for mocking up I use this stuff it's
3:10
called ready board again if you're
3:12
following the channel you've probably
3:13
seen me show this before it's just a
3:15
foam uh Cuts really nice it's just over
3:18
an eighth of an inch thick and you can
3:20
get it big sheets like that that's a
3:22
full sheet uh at the dollar store for
3:24
$125 so good stuff to work with Okay got
3:27
my piece has cut um if if you're cutting
3:30
this stuff I'd suggest getting some kind
3:32
of a blade like this where you've got um
3:34
blades that you can break off and make
3:36
sure you have a really really sharp
3:37
blade that gives you a nice CR crisp
3:39
edge here um all right I've been kind of
3:41
mocking it up test fitting it in the car
3:43
at this point I'm going to go ahead and
3:45
just put a couple of very small pieces
3:47
of double-side tape on it get it mounted
3:49
in the car and then make sure my
3:50
clearance is good when I close the trunk
3:53
and this is what the two pieces look
3:55
like in the car um I did make sure I
3:57
have plenty of height here I've got I
4:00
can fit my finger in between the um
4:03
bottom side of the trunk lid and this
4:06
area so height-wise it's no problem um I
4:09
do need to verify that everything is
4:11
good in terms of clearance with this
4:12
hole I'm going to be wrapping this again
4:14
this will be made of ABS plastic I'll CA
4:17
glue it to this panel we're going to
4:19
fill it in kind of feather it out here
4:22
um sand the whole thing down and then
4:23
I'm going to hit it with a um a high
4:25
Build primer but when I upholster this
4:27
I'm going to take the carpet basic
4:29
basically cut an X in it roll my edges
4:31
over inside of this so it's just a clean
4:34
hole that's just large enough for this
4:36
latch um the latch is up there behind my
4:39
light and again at this point what I'm
4:41
going to do I'll pull my floor out um
4:44
again this is just my mockup piece
4:46
that's going to be one of the upcoming
4:47
things we're working on um and I'm going
4:50
to get inside the trunk close the trunk
4:53
with me in it and uh take a look around
4:56
here and make sure I've got just enough
4:57
of a gap I want it to be a small a hole
5:00
as possible uh but I want to ensure that
5:02
the carpet doesn't rub on the latch so
5:05
I'm going go ahead and get inside the
5:06
trunk all right um for any of you OG
5:09
people I'll be 55 in December get a
5:12
little old to be in the trunk but um all
5:15
in the name of sound quality so I took a
5:17
look at this uh it's kind of tough to
5:19
tell here I'm going to make some slight
5:22
adjustments trim one side and then we
5:24
should be good foam mockup is complete I
5:27
did have to take a little bit more off
5:28
the sides actually
5:30
um these three sides I trim down just a
5:32
little bit again getting back in and out
5:34
of the trunk just to make sure I've got
5:36
plenty of room for carpet uh plus
5:38
probably an eigh to 3/16 left over uh
5:41
just to ensure also there needs to be
5:43
some adjustment this thing is it can
5:45
adjust back and forth up and down all
5:47
that so I wanted to allow for that as
5:49
well um couple of other quick things you
5:52
might notice that um I squared off these
5:54
Corners these inside edges a lot of
5:57
times if this was going to be finished
5:58
and if I was just going to to paint this
6:00
I would round these just to give it a
6:02
softer look but when I roll the carpet
6:04
in it's kind of it'll naturally look a
6:06
bit rounded this this carpet is pretty
6:08
thick that I'm putting it it's about a
6:09
quarter of an inch thick also you might
6:11
be wondering well why didn't you just do
6:13
this out of one piece uh and bend it um
6:17
I thought about that but figured this
6:18
would be easier again I'm just going to
6:20
se glue the ABS in place and sand it and
6:23
fill it it'll kind of look curved when
6:24
I'm done all right so at this point I
6:26
can transfer this piece to the ABS
6:29
plastic
6:30
all right got my ABS plastic laid out so
6:34
um Jason if you're watching uh first off
6:37
thank you for your input on this design
6:39
as well sorry I didn't go with your idea
6:41
but hopefully you like what it looks
6:43
like in the end um I remember when I was
6:46
recently I forget what I was cutting uh
6:48
ABS 4 probably the near wall you would
6:50
mention man it looked like that uh table
6:54
saw was about to bite you with the ABS
6:56
for some reason I don't know what it is
6:58
man I get freaked out cutting ABS on a
7:00
table saw um I'd rather router 8in
7:04
aluminum so I am going to hand cut this
7:07
with a with a sharp new blade this too
7:09
I'm just thinking about it this is
7:10
something that some of you newer guys
7:12
you um modern installers if you will
7:15
probably would 3D print this or or cut
7:18
it with a you know some kind of a
7:20
automated device that you map this out
7:22
and click a button and it spits it out
7:24
but I'm going to go old school foam
7:27
templates and use a razor blade so um
7:31
I've got everything marked I'm good to
7:32
go now I'll go ahead and score this with
7:34
a razor blade cut it saying my edges as
7:37
needed and we'll be all set with that
7:40
God damn
7:42
it all right figured I'd show you what
7:45
I'm doing here when I go to score this
7:47
uh so again this is kind of an old
7:49
school way that I used to cut ABS um you
7:52
can use like a Dremel obviously or g a
7:54
table saw um but this is to me probably
8:00
I don't know the easiest and still you
8:01
get really good results so again I'm
8:03
just taking it with a um really good
8:06
sharp fresh
8:08
blade making a few scores in it this is
8:11
E8 inch ABS by the
8:13
way I'll score
8:18
it and then just break it like that
8:21
gives me a really nice crisp clean Edge
8:23
and no uh risk of taking my fingers off
8:26
in a table saw when I go to do the
8:28
inside edges that's going to be a little
8:30
bit trickier but again same principle
8:32
score it break it and pull it apart so
8:35
I'll go ahead and get this prepped one
8:37
down one to go okay got the second one
8:40
cut I'll show you this detail also um
8:43
when I cut it it gives me kind of a high
8:45
edge here just from the blade going
8:47
through uh so I'll take a sanding stick
8:50
just 60 grit or 80 grit sandpaper double
8:53
side tape to a flat piece of wood and
8:55
I'll sand it this way I've already done
8:57
it with this piece and you can see um
8:59
this whole thing again is going to be um
9:01
primered over so uh I'll get these
9:03
cleaned up and we'll get them test
9:05
fitted on the car all right here are the
9:08
pieces uh they're just sitting in there
9:10
now I'm about to double side tape them
9:12
but I also need to uh line up the
9:15
striker nothing is centered on this car
9:17
from the factory um the striker is just
9:20
slightly off center um thank you BM but
9:24
um all good so at this point I'll put my
9:26
masking tape back on Mark so that I um
9:29
where I want to be with the striker I'll
9:32
double side tape everything in place and
9:33
then I'll get back in the trunk just to
9:35
triple check uh before I see a glue
9:37
these both into place all right I did
9:40
one last test for clearance everything
9:41
looks really good so this point I'll go
9:44
ahead and see a glue these two pieces to
9:46
the near wall if you are new to the
9:49
channel when I say CA glue this is the
9:51
stuff that I use it is a two-parts
9:53
basically um a two-part superg glue
9:56
basically so um I get I like to get the
10:00
uh thick stuff uh this is somewhere
10:03
around here extra thick that's the stuff
10:06
I like to use depending on the
10:07
application so um there's different
10:10
viscosities of the actual glue itself
10:11
and then this is just a little sprayon
10:13
hardener so you apply it on uh one on
10:16
each surface and then touch the two
10:19
together once they touch they're not
10:20
going to move so get it right the first
10:21
time all right here we go all right I'll
10:23
bring you along for this part uh so next
10:25
what I'm going to do is use the CA glue
10:28
what I'm doing at this point it's just
10:30
going to tack these Pieces Just meaning
10:32
just just put enough adhesive on just to
10:35
be able to get them um stuck in place
10:40
and then I'm going to pull the panel out
10:41
of the
10:43
car at which point I will go through and
10:47
now I'm just going to spray this on
10:49
here and when I pull it out of the car I
10:52
will then Build It Up really
10:56
nice all right and again if you've never
10:59
used use this stuff it only takes a
11:00
couple of seconds to cure it's very
11:07
quick and you can't see it from this
11:09
angle but I've got my reference line for
11:12
where my Striker needs to be or the
11:15
piece needs to be relative to the
11:16
striker so got that one on that should
11:19
be good now I'll go
11:22
ahead do the same thing to the other
11:24
piece
11:29
and just a little drop I do realize too
11:32
you're going to see in a second that the
11:34
ABS plastic hangs off of the edge of the
11:37
near wall which I want I'm going to
11:39
build that up I did that kind of
11:40
intentionally or
11:42
intentionally and I want to kind of I
11:45
want it to look like it was meant to be
11:53
there all right give this just a couple
11:57
of seconds
12:00
recommend wearing gloves too because
12:01
this stuff is is nasty uh use acetone uh
12:05
to remove it if it gets on your skin
12:08
okay we'll let that cure up just a
12:10
little bit pull it out of the car and
12:12
we'll be able to continue from there all
12:15
right at this point I've got the piece
12:16
out of the car um the amount of glue I
12:18
put in was plenty to hold it in place
12:21
and now what I'm going to do is just go
12:22
around the perimeter I'll kind of show
12:24
you how I do this nothing
12:27
crazy and
12:30
I'll build up the glue
12:33
so you want to be careful not to cross
12:37
contaminate these two adhesives you
12:39
don't want to get harder on this bottle
12:43
CU that'll be kind of a mess
12:48
so an idea and it doesn't matter if I go
12:51
over and make a little bit sloppy I'm
12:53
going to do a bunch of sanding and
12:54
filling on this piece so at this point
12:57
again I've just added my glue there it
13:00
may run a little bit too all
13:04
good this is just to rough this out so
13:06
I'll do the same on the other side along
13:08
the edges make sure it's really solid
13:10
and we'll move to the next part CA glue
13:12
complete you can see I've got it on the
13:15
sides
13:16
there and we're good so everything's
13:20
nice and solid my gapping is really good
13:23
once again so now at this point I'll uh
13:26
pull it back out of the car this is a
13:27
little bit of a high spot here here so
13:29
I'll knock this down sand this down and
13:32
then we'll start to use what I call
13:34
Kitty hair it's a short strained
13:36
fiberglass reinforced body filler and
13:39
then I'm going to kind of feather this
13:41
area out we'll build this up and again
13:43
kind of make this look like it was meant
13:44
to be like it's kind of just a very very
13:47
slight kind of transition into this area
13:49
so all right let's go ahead and pull it
13:51
out of the car and we'll get that going
13:53
all right at this point I uh went ahead
13:56
and sanded this top area here uh I just
14:00
use a sanding block that same block I
14:02
showed you earlier uh just to get the
14:05
residual uh buildup from the CA glue off
14:07
of there next I'm going to build up this
14:10
area this is the product I'm using again
14:12
it's a um Bondo glass I guess you would
14:15
call it is a
14:17
manufacturer um this stuff just mixes
14:20
mixes
14:21
up I'll go ahead and add my
14:24
[Music]
14:25
hardener and I'll show you how this
14:27
works
14:29
similar to a automotive filler except
14:34
this is I think it's stronger
14:38
um and also it does a better job of
14:41
filling these larger areas
14:44
so show you this for just a
14:51
sec all right so I've got just a little
14:53
bit mixed up
14:55
here now I'll just start
14:59
building this area up just kind of
15:02
Feathering it
15:09
in with this stuff I normally mix up a
15:11
little bit less than I think I need
15:13
because it's pretty easy to waste the
15:17
material so that's kind of what I'm
15:19
looking for
15:21
there next and you have a okay wind open
15:25
time depending on um how much hardener
15:27
you mix in and how hot it is
15:29
out and the
15:39
humidity you obviously want to try to
15:42
[Music]
15:45
remove as much as you can versus sand it
15:48
I see some people just glob it on like
15:50
crazy and end up sanding you know 80% of
15:53
it away you want to try to avoid that if
15:57
possible and I tell where I'm going to
15:59
have to do probably couple two or three
16:02
applications which is fine you can
16:04
always add more anything I uh have to
16:07
sand away is just waste wasted material
16:10
time all that
16:14
so
16:16
okay we'll get this on this stuff cures
16:19
up pretty quick normally by the time you
16:21
clean up the uh your mixing plate if
16:23
you're using
16:27
one it'll harden up pretty especially to
16:29
be able to do a second application it's
16:32
pretty easy to work
16:34
with um it's pretty forgiving so I'll
16:37
continue to do this I'll build this up
16:39
until I get it to where I want start
16:41
sanding it and then ultimately uh make
16:44
the total shape so I'll keep working
16:46
away and I'll report back here in just a
16:47
moment all right making progress filling
16:49
and sanding I just want to show one
16:51
little kind of a cool detail I probably
16:52
should have shown you this before I had
16:54
a gap right in here of about an eighth
16:56
of an inch on this area here so there
17:00
was a a gap between the ABS and this
17:03
panel of about an eigh of an inch so
17:06
instead of I didn't have to you know I
17:08
didn't want to cut a piece of abs and
17:10
all that I just put a piece of tape in
17:12
here taped it from this backside and
17:15
then added the kitty hair into this side
17:17
and I ended up with a really nice proper
17:19
fill in this will harden up really good
17:22
and it looks uh finished so um this is
17:25
where I'm at so far you can see where're
17:28
kind of build this up to
17:31
transition and that's what I'm looking
17:33
for just a really subtle little Ridge
17:35
there so I'll continue to build this
17:37
shape it you can see my low spots there
17:40
um and keep going on it all right just a
17:44
quick check in making progress uh if you
17:47
notice too I'm switching between I use
17:50
uh metal and rubber uh scrapers they
17:54
both give you a slightly different kind
17:55
of an effect now when I've got these low
17:58
spots like this uh I'll go through and
18:00
use the hard scraper just to be able to
18:03
get the uh rest of the mud into that
18:05
area uh same on that side um and also
18:10
one other little Pro tip if you're doing
18:12
this or doing like finish work with like
18:14
Bondo or whatever I use compressed air
18:17
to really blow the dust off after I sand
18:20
really good and then I'll even take a
18:22
spray bottle and some water and just wet
18:24
the area and get it out of the way so
18:26
that I've got a nice clean surface for
18:28
the next coat to go on otherwise
18:30
sometimes it doesn't stick very well and
18:32
you go to sand it it just kind of peels
18:33
off so making good progress liking it so
18:36
far and uh I'll keep moving along here
18:39
all right trunk latch cover basically
18:43
complete um I will be carpeting inside
18:46
of there you can still see just on the
18:48
edges here the um bolts that hold in
18:52
this uh latch so that'll all be carpeted
18:56
inside there and then again my carpet
18:58
will come over here roll over notice
19:00
where I've got just a very slight kind
19:02
of a transition that's what I was after
19:04
just again to make it look like it was
19:07
intentional as if BMW made it um notice
19:10
too I sanded the rest of these um I did
19:13
some rattle can primer on these side
19:15
panels and on the near wall and didn't
19:18
look that great I'm not obviously this
19:20
is going to be carpeted but it's going
19:22
to driving me crazy so the next thing
19:24
I'm going to do is pull out the side
19:27
panels resand those and I'm going to
19:29
spray all three pieces with some buildup
19:32
primer and then I'm going to do a mockup
19:34
of uh my last idea uh the last piece of
19:38
the puzzle for these side panels I'll
19:40
show you that at the very end of the
19:41
video so um the other thing too in case
19:43
you've been checking this I've got kind
19:46
of an undone area up here in the corners
19:48
on both sides and that is intentional I
19:51
might be doing some lighting up there so
19:54
I'm going to leave that kind of opened
19:56
up for now uh but we'll see how that
19:59
goes after I test all the rest of my
20:01
liting so all right at this point I'm
20:03
going to wrap it up for tonight and then
20:06
tomorrow I'll pull the milts out pull
20:07
the floor out side panels get everything
20:10
out we'll sand it I'll show you how I do
20:12
the um the highb Build primer and we'll
20:15
get these things
20:17
Reed all right it's the next evening uh
20:21
dark out as you can see I am out in my
20:24
driveway and I've got the side panels
20:26
out I did a little bit more sanding and
20:29
um prepping on these got them all ready
20:33
to go uh taped off the brackets that I
20:35
built and then here I've got the near
20:38
wall all sanded prepped wiped down and
20:41
ready to go so at this point I'm going
20:43
to go ahead and get the primer gone and
20:46
I'll show you what I'm doing here okay
20:48
this is the product I'm using I realized
20:50
I got primer all over the can the label
20:52
so you can't read it but it's uh speed
20:54
coat is the brand available on Amazon
20:56
it's think it's about $100 a gallon this
20:58
is a high build
21:00
two-part um primer which is what I
21:03
should have used the first time I used
21:05
some rattle cam primer and it was junk
21:07
uh super thin this will put on a nice
21:09
relatively thick coat um and kind of
21:12
candy coat uh those three pieces so this
21:15
is the gun I use super cheap this is
21:18
like 10 bucks at Harbor Freight I think
21:20
it's more money for the regulator in the
21:23
um that's a moisture evaporator device
21:26
right there so uh I'll mix it up put it
21:29
into the gun and then hopefully I can
21:31
get a little footage where you can see
21:33
uh me actually spraying this on
22:24
all right it's a few days later and I've
22:27
got the piece is primed now what I'm
22:29
going to do is just go through knock
22:31
them down with a little bit of 60 grit
22:33
uh which I think will help uh when
22:35
they're scuffed up that'll help also
22:36
with the glue for the upholstery so I'll
22:39
get all three pieces sanded and show you
22:41
what those look like in just a few
22:43
minutes and here is everything back in
22:45
the trunk all the panels obviously I
22:47
don't have the Milbert sitting in there
22:49
um but I wanted to get an idea make sure
22:51
everything looked good with the side
22:54
panels my seams again up here I'll I'm
22:58
considering doing lighting if I don't do
23:00
lighting I'm going to close up that area
23:02
but you can see my gaps are still good
23:05
gaps are nice and consistent every time
23:07
I put everything back together that is
23:09
what the um latch are is going to look
23:13
like and then again the carpet's going
23:15
to roll inside of that and there'll be
23:16
all carpet the inside of it as well so
23:18
it'll all be very finished you won't see
23:20
any of the mounting hardware that'll be
23:22
covered up as well uh and that is it so
23:27
with this video there one other little
23:29
thing I want to show you kind of an idea
23:31
I have so give me just a couple of
23:33
minutes I'm going to set that up see
23:34
what it looks
23:35
like all right uh work with me here use
23:38
your imagination Earl had a cool
23:41
idea um of doing zebra wood on the side
23:46
panels he said do a really kind of a
23:48
thin piece uh and I'm intentionally not
23:50
showing you this just yet I'm setting
23:52
this up um I thought wouldn't it be cool
23:55
to take the factory wood wood that's on
23:58
the car on the interior of the car which
24:00
is approximately 2in strips that go on
24:03
the doors and on the dash and replicate
24:05
that in the
24:06
trunk put some paper in there to kind of
24:10
see what that would look like um
24:13
obviously it's not straight it's kind of
24:15
just all over the place
24:16
but the objective is to kind of pull
24:19
your eye into where the milbert's are
24:22
and kind of break up the big side panel
24:24
so uh Earl if you're watching I'm sure
24:26
you're going to tell me no no no go much
24:29
smaller like half the size and I don't
24:31
know where they would go too do they go
24:33
all the way up to this front area and
24:37
looking at this how far back do they
24:39
come uh so again this is just
24:42
spitballing just kind of I want to be
24:44
able to have some thought on this before
24:47
um you know I'm to the point where I'm
24:49
actually upholstering so all right so
24:52
with that this is going to close out
24:54
this video so I know again it was a
24:56
short video if you made it this far
24:57
thank you very much much um in the next
25:00
video I'm going to be doing the trunk
25:02
lid cover I'm going to get literally
25:04
start working on that in about 10
25:06
minutes so I'm going to put the the
25:08
phone down stop recording this pull the
25:09
trunk lid and get to work on that I've
25:12
got some really cool ideas for that um
25:14
there's going to be some neat things
25:15
going on there so thank you very much
25:17
for watching certainly appreciate it if
25:19
you have not already please like And
25:21
subscribe and there will be much more
25:23
music content coming soon thanks very
25:25
much talk to you soon take care