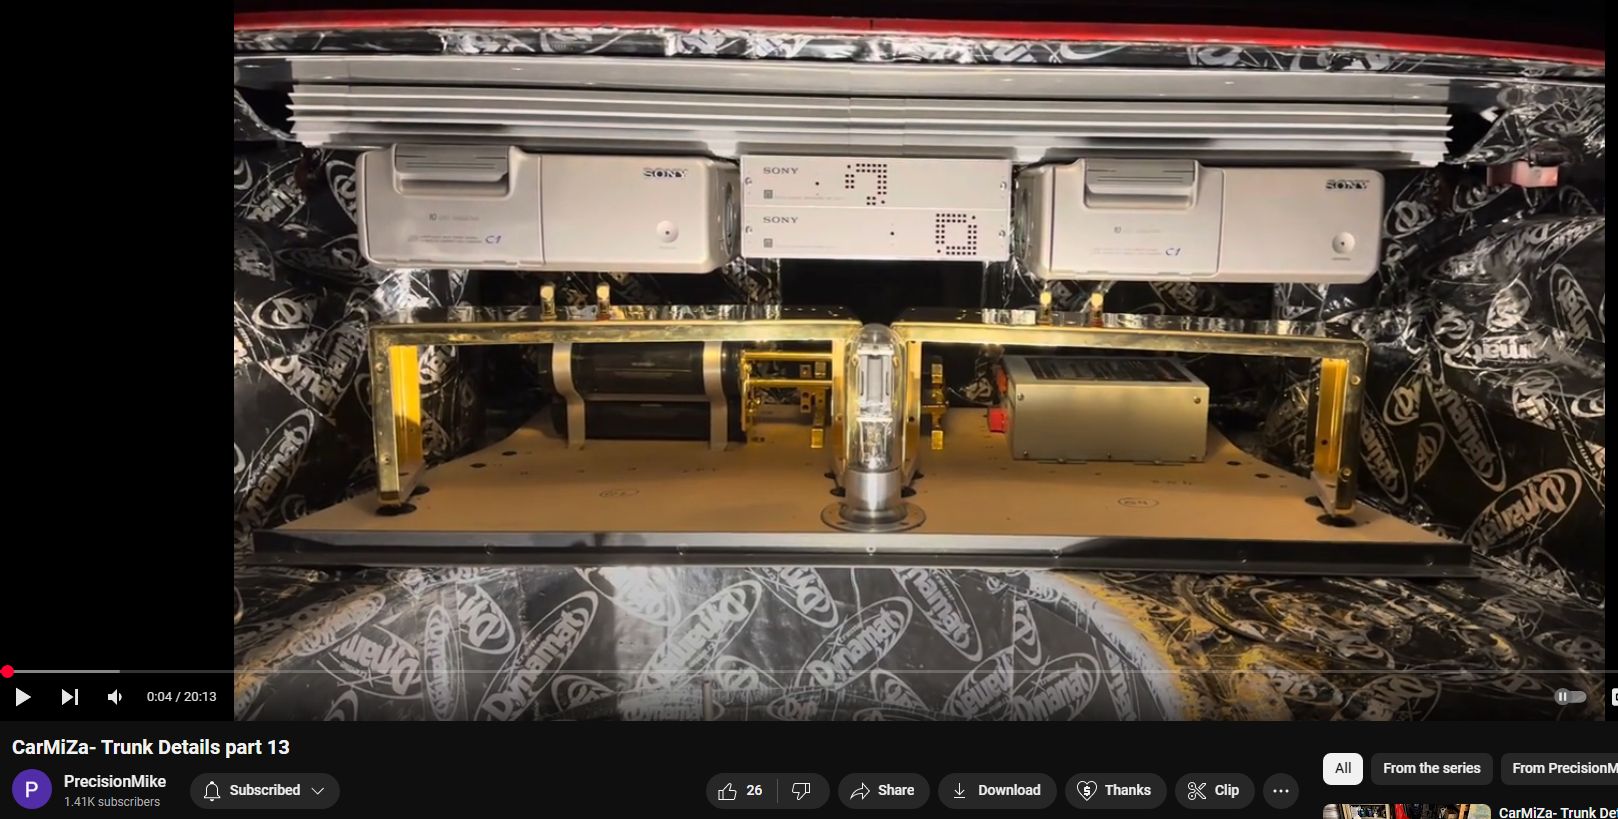
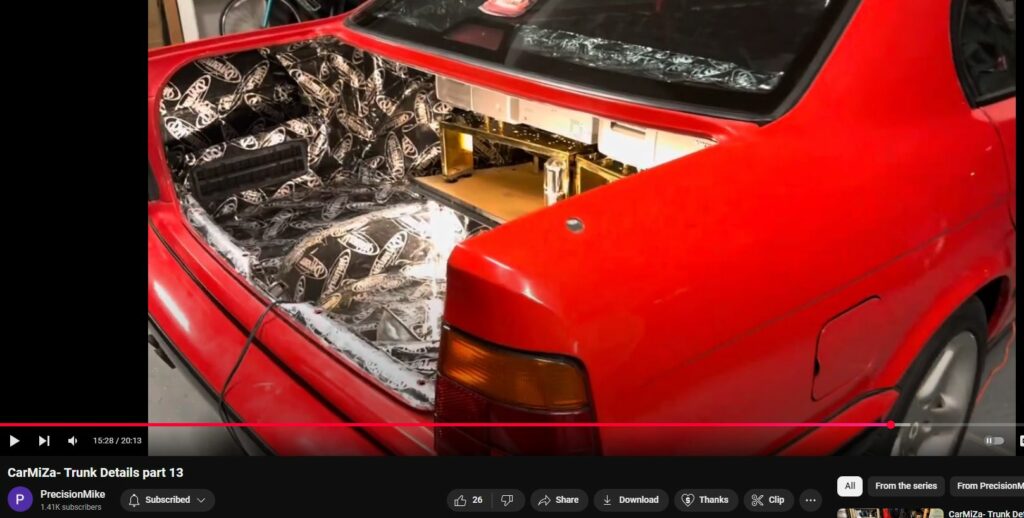
0:01
hello and welcome back to Cara this is
0:04
trunk details part 13 and in this video
0:07
I will show how I got to this point stay
0:11
tuned
0:14
before
0:16
after if you've been following along but
0:18
watching my videos uh on the last video
0:22
I kind of got my butt kicked by these
0:23
side brackets I have since replaced
0:26
those uh they came out very very good
0:29
very solid
0:30
and on this particular chest see this is
0:32
going to be the finished one going in
0:33
the car I got these screws out because
0:36
I'm about to see if I can get away with
0:39
flush trim routering the entire
0:42
assembly so that's the other side side
0:46
brackets everything come out very good
0:48
there very solid notice I mean it's
0:52
terms of a gap
0:54
there's nothing um I may have to open
0:57
that up just a slight bit when these get
1:00
uh prior to these getting goldplated um
1:03
if you
1:04
see
1:07
here they fit together like perfectly
1:12
this is going to be the side that'll be
1:13
facing the viewer when you open the
1:16
trunk put that too look at that it's
1:19
exact so now what I'm going to do and
1:22
I'm going to use if you notice so what
1:24
I've done again is I've gotten rid of
1:27
the bottom of the this is the P1 the
1:29
bottom of the P1 that's right here and
1:33
the top of the X1 right so if you look
1:35
over here you can see those two pieces
1:39
so it's this piece and this piece I got
1:41
rid of and then you can see where
1:44
there's kind of a a a big seam there
1:47
right so I got rid of both of those and
1:49
then Built My Side brackets instead so
1:52
what I'm going to do I'll pull this
1:53
apart I'll attach this to the bottom of
1:56
the P1 and I'll use this as my test
1:59
piece uh to try routering I've got to be
2:02
really careful
2:05
especially back here with the depth of
2:08
the router because if the bearing was to
2:10
fall into any of these holes these
2:12
should be fine um but I've got to be
2:15
really careful like on these two because
2:17
if the bearing follows that and goes in
2:19
there it's going to just take a big
2:20
chunk out of the chassis so I got to be
2:23
really careful uh so let's see how it
2:26
goes not sure how well this uh comes up
2:30
on video but that works pretty well um I
2:35
think I'm going to be good there so I'll
2:37
reassemble the whole thing and then run
2:40
it around with the router and that'll
2:43
get it a nice clean Edge let's give it a
2:46
shot all right that worked out in the
2:49
words of Clark Griswald I still have
2:51
some trimming to do
2:53
um but you can see like right here it's
2:56
like perfect um I do have to clean up
2:59
the corners a little bit and there's it
3:02
didn't get all of this I'd rather have
3:04
it where I have to trim away a little
3:06
bit than where it got more than I wanted
3:08
it to
3:11
so pretty cool now I'll just go through
3:15
clean it up I'll pull the top and bottom
3:17
off uh let me go ahead and do that and
3:19
then it should look pretty
3:21
sharp all right to clean up the edges as
3:25
I need to a little bit um once again my
3:28
friend the sanding stick and I'll just
3:31
do this with uh a little bit more
3:33
carefully but s it back and forth that
3:36
way it is nice and flat all right a
3:37
little out of order edit here um when I
3:41
last showed the P1 and X1 I was real
3:44
happy with it then I had found an issue
3:48
which is now fixed in this this part uh
3:51
with this cover the cover the sanding
3:54
stick I got too aggressive and I ended
3:56
up sanding this at an angle so you'll
3:58
see it just a moment where I go through
4:00
and redo the cover for the P1 all right
4:03
it's the next morning and I'm not going
4:05
to go an inch further without redoing
4:08
the top of the P1 uh cuz it's the way I
4:10
roll so I went and grabbed the other
4:14
units that I've got I've got three of
4:15
these and I'm going to just pick the
4:17
worst one none of them are in that bad a
4:19
shape which is kind of unfortunate
4:21
they're they're actually quite clean
4:26
um so I'll pick the worst one and
4:29
that'll be the sacrificial cover and I
4:32
will use that it's like going to be this
4:34
guy um somebody looks like got a
4:38
screwdriver uh it wasn't me um and arked
4:41
out the chassis to the 12vt um so yeah
4:47
that one looks to be the worst one so
4:49
I'll use that one and I won't show the
4:51
detail on that but I'll go ahead and get
4:52
that one in routered drill for the cover
4:56
uh open up the holes for the larger
4:58
bolts all of that fun stuff so let me go
5:00
ahead and do that now okay I did a new
5:03
cover just want to show this out in the
5:05
sun where I've got some really good
5:07
light I am happy with that so now I
5:10
still have to drill the holes in the top
5:12
of the P1 to redo the plate and then
5:15
I'll be
5:16
good okay redid the
5:20
P1 and now I'm very happy I
5:24
think it's still there's aspects about
5:27
it that are maybe not totally perfect
5:29
perfect
5:30
but again based on uh just doing the
5:34
stuff in my garage with hand tools
5:36
things like
5:38
that um my Fisher Price SL Harbor
5:41
Freight stuff not going to blame the
5:43
tools but uh I think that's as good as
5:46
it's going to get if I try to screw
5:48
around with that anymore I'll only make
5:50
it worse so all right so now P1 and X1
5:54
are done let's get the Changers mounted
5:57
all right first St with the Changers is
5:59
is to determine where I can mount the
6:02
screws and drill
6:05
into the case so it's kind of tough to
6:08
see in here but I have marked this blue
6:11
Mark basically represents as far this
6:14
way as I would want to go and I did the
6:16
same thing here there is a gear in there
6:20
but I've got plenty of room to work with
6:22
cuz the bolt head it once again is less
6:24
than an eighth of an inch I'm using
6:25
these
6:26
bolts uh these are the same qu 20s that
6:29
I use for the P1 and X1 and I'll be
6:31
doing six per changer once again quite
6:34
Overkill but you can see in there um
6:38
when this
6:39
is this back in that basically
6:42
represents bottomed out that's what
6:45
those limits are but normally it's kind
6:47
of
6:48
floating um so I've got plenty of room
6:51
and I'll go ahead and get my holes laid
6:53
out on this piece just to be completely
6:55
safe here is a piece of quarter in MDF
6:59
it's really tough to see inside of there
7:01
but with that bottomed out it's barely
7:04
just rubbed on the top of the gear so4
7:07
in versus 0.1 in I'll be safe the next
7:11
step for the Changers I have them double
7:13
side tape to the on zapco
7:16
Bottoms um they're really solid on there
7:19
so they shouldn't move around um and I
7:23
put a straight edge against the two
7:25
Changers measured the Gap to the P1 next
7:30
one um everything is good there the
7:32
strage on the Changers is straight it's
7:36
straight compared to the fins on the
7:41
amplifier um I made sure that the Gap
7:44
you know was exactly the same it's it's
7:47
kind of tough to see there but it's 1
7:50
in between each changer and the P1 or x
7:53
one so placement of these items is final
7:57
now at this point so
8:00
um now I'll go to the next step now I
8:02
have both Changers pulled apart where I
8:04
just have the top cover and the uh ones
8:09
that go bottom so excuse me I've got
8:13
it's tough to see there see my mark that
8:16
I put on the one zap go bottom that
8:18
again represents as far to the left and
8:21
right as I want to go I put the same
8:23
marks just little pen uh Sharpie marks
8:26
on the one zapco now when I pull this
8:30
out I can do the same clearance check
8:33
because I'm going to have the nuts are
8:35
going to be mounted inside of the amp
8:38
and if you notice if I was to draw a
8:39
line here and look here tons of real
8:42
estate the middle looks fine I've got
8:45
the Caps which won't be in the way and
8:48
then here I'll probably go in between
8:52
this line and these caps and this here
8:54
is 3/4 of an inch deep so no problem I
8:58
thought for a second there I might have
8:59
to get out the plexiglass template but
9:02
uh no problem at all so now I'll get the
9:04
holes laid out on the
9:07
changers in case you're wondering I am
9:09
using a square and getting this laid out
9:12
nicely I have both Changers laid out I
9:16
did a center punch for each hole again
9:18
there'll be six bolts holding each one
9:20
in now time to bring these to the drill
9:22
press and get all right once again
9:24
probably an Overkill uh step here but
9:27
I'm using an E8 in drill bit to sure
9:29
that I hit my mark uh that I have Center
9:32
punched and then I'll upgrade it without
9:35
moving the drill press to that's I think
9:37
a 1764 so slightly bigger than a quarter
9:41
gives me a little tiny bit of place
9:42
should I need it so let's go ahead going
9:44
Ride Along go ahead and get this one
9:48
drilled and also obviously I'm still
9:50
double side tape to the zapco
9:54
bottom sorry for damaging your
9:57
instructions there Sony
9:59
a little tricky to do with one hand
10:14
here all right we are
10:17
through now shut it off change out the
10:21
bit and I'll be good and then I'll
10:23
repeat that 12 times between the two
10:25
Changers okay all holes are drilled came
10:28
out very good
10:29
now I'll pull these two pieces apart um
10:33
the cover from the uh changer and deur
10:38
and then use the hardware to get it all
10:41
uh mounted together and then I'll test
10:43
fit those into the zapco and make sure
10:46
they look good stand by changer chassis
10:48
are bolted together bolted to the bottom
10:52
I I haven't mounted this yet I just
10:54
wanted to make sure everything is good
10:55
with play nothing's rocking back and
10:58
forth no no issues
11:01
there little bit Overkill um again
11:05
that's kind of
11:06
mymo um and
11:10
then got the other one this is the
11:12
driver side looks good everything is
11:15
solid there plenty of room and again if
11:17
you look at T to tell
11:20
here where they where those bolts come
11:23
into play they just miss that auxiliary
11:26
board no issues there and then I'm away
11:29
from those large capacitors so no
11:31
problem there so at this point um got to
11:35
reassemble the Changers again we're just
11:37
going to have the shells cuz I want to
11:39
see what this whole thing looks like in
11:40
the car so let's get those put back
11:42
together
11:44
next all right this will be or this is
11:48
the final check of these items before I
11:51
put the one zap coat back in the car and
11:54
then put the bottoms on for the Sony
11:57
part that'll be the first time
11:58
definitely a milestone that I will be
12:00
able to see what this stuff looks like
12:02
in the
12:03
car um taking a look at
12:06
this just one last check everything is
12:09
bolted in now you can see that
12:12
definitely turned out exactly kind of
12:14
what I had envisioned it's going to
12:16
allow for real quick easy
12:20
servicing and hopefully no issues so I'm
12:23
going to go ahead and get the one zapco
12:25
in and we'll get the Sony Parts in as
12:27
well I know there's still a lot to go
12:30
but for me this is definitely a
12:32
milestone to finally be able to
12:35
see would went from my vision of trying
12:39
to replicate what Earl had initially in
12:42
the car like that and by the way I just
12:44
talked to him on the phone I had never
12:47
seen the car in person with this setup I
12:49
only saw the original setup that Henry
12:51
did uh before the gold and before the
12:53
two c1s so um I did I did manage should
12:59
get a bunch of pictures from Earl at
13:00
some point I'll upload those too there's
13:01
got to be a thousand of them of the
13:03
build when he did it this way but um
13:08
very happy with everything I did manage
13:10
to go through there was some some
13:12
aspects of the um brackets on the P1
13:16
andx one I didn't like and I said I
13:18
wouldn't mess around with it I did of
13:20
course um but I am very happy with that
13:23
I think that looks really cool with um
13:26
the deletion of the bottom of the P1 in
13:29
the top of the X1 and it looks very
13:30
clean like it was meant to be um this
13:33
lighting this is just a little shop
13:35
light I got sitting in here but that's
13:37
kind of the Shadow type of lighting that
13:39
I all had um there will be once again
13:42
the dioic lights in along the back side
13:45
of the trunk wall so it's going to cast
13:46
the light the same way and give you the
13:49
Shadows um keep in mind again everything
13:53
is very rough right now the one zap code
13:55
still needs to be repainted uh that is
13:58
just um uh media blasted at this point I
14:02
know it looks like it's painted Earl and
14:04
I again just got off the phone he
14:06
thought I had painted it already that is
14:08
just media blasted and it's an anchor
14:10
profile it's called and that again is
14:12
what allows the U material to be strong
14:15
enough or or prepped for proper adhesion
14:18
for paint um but it looks like it's like
14:22
almost like a metallic paint the C ones
14:24
also these again are just uh couple of
14:28
spares that I have that aren't in great
14:30
shape again you can see all the
14:31
scratches there but it allowed me to get
14:33
everything mocked up these are um Hollow
14:37
and again um one thing here I had to be
14:40
very careful to make sure that I could
14:42
open these and you can without any
14:45
problem very solid latch on those things
14:49
um the P1 and X1 brains those are going
14:53
to be goldplated once again and
14:55
obviously you know no guts in the milts
14:57
or anything like that but all in all
14:59
being able to sit back and take a look
15:01
at what this thing is going to look like
15:03
is make it my day I got to tell you so
15:07
all right let me uh give you some more
15:08
details here and then I'll go ahead and
15:10
close out this short video here's the
15:12
view from a little bit further back
15:14
again I think that looks really cool um
15:18
all right so closing out this video uh I
15:21
am I just wanted to provide some
15:23
information kind of where I'm at with
15:24
the build so far I am currently at like
15:28
within an hour of 1,000 hours on the
15:31
build I know it doesn't look like much
15:33
but if you've been watching this series
15:35
and you see the level of detail the
15:37
amount of time all of this is taken uh
15:40
you know why I'm at 1,000 hours I'm at
15:42
400 hours so far in the trunk um also my
15:46
father's been sending me updates on the
15:48
zebrawood he's probably he's again he's
15:52
86 years old be 87 in January so he
15:54
doesn't work Works a little slower than
15:56
I do if you can believe that but but he
15:59
is um probably a couple of weeks away
16:02
from being able to ship that to me when
16:04
I get it I will put that in and I will
16:07
mount everything even before I finish
16:09
the wood I'm going to I'll be doing the
16:11
staining and not sure what exactly yet
16:14
epoxy clear coat I'm still going to do a
16:16
bunch of testing on that but I'll show
16:19
that it is coming out amazing guys it
16:22
looks incredible I can't even imagine
16:25
this with you know everything done with
16:27
that zebra wood it's going to look
16:29
really cool um I'm also just so everyone
16:32
knows that's been following I'm going to
16:34
do my goal is to do like a short
16:36
overview video maybe 10 minutes or less
16:39
for anybody who's kind of new to
16:41
following the build and I'll post that
16:43
on like some Facebook pages probably on
16:45
milbert's um web page and it'll just be
16:49
a 10-minute video of where I'm at with
16:51
the car kind of just a short recap so
16:54
keep on the lookout for that probably
16:56
hopefully get that done in the next week
16:57
or so I'm also going to be taking a
16:59
short break from working on the car I
17:02
wanted to get to this point before I did
17:04
that I've got some other cars and other
17:06
things to do my garage is a mess you
17:08
guys probably saw my bench is totally
17:11
disgusting the uh my workbench I I
17:14
noticed this the other day when I was
17:15
shooting some video it's not dirty it's
17:18
just worn I do a lot um beyond the BMW
17:23
I've got other cars I work on we have
17:26
horses so I'm constantly using this to
17:29
fix whatever gets broken around here and
17:31
again I've got to get like I've got this
17:34
Mercedes um E55 AMG had a windshield put
17:37
in two months ago I haven't driven the
17:39
car since and I've got another one
17:41
outside that needs some work as well so
17:44
I'll take a short break um hopefully
17:47
maybe a couple of weeks tops and then
17:49
I'll be back on to the BMW from there
17:53
I've got to figure out what I'm going to
17:54
do next I've got you know basically the
17:57
way I see it I'm calling and this the
17:59
the Milbert rack this bottom part that
18:01
is roughed out meaning I've got
18:03
everything figured out with all the
18:04
mounting and all of that still a bunch
18:06
to do I've got to get you know I'm going
18:08
to finish off the bracket the Shroud for
18:11
the 845 tube I've got a lot to do with
18:14
the milbert's um you know I've got some
18:17
brazing to do with like those brackets I
18:20
made I've got to get those
18:22
goldplated I'm going to recap everything
18:25
in the zapco the two zapco recap all the
18:28
Sony's um new DC to DC converters uh if
18:33
I haven't swapped them out yet in all
18:35
the Sony components so there's still you
18:37
know a lot to do even with and then this
18:40
part I'm calling the hanging rack so
18:42
hanging rack and the Milbert floor still
18:44
a bunch of work to finish that off and
18:47
get it completed but I think I'll hold
18:49
off on that stuff that'll be the last
18:51
detail stuff I think the next thing I'm
18:53
going to start working on is what I'm
18:55
calling All trim panels so on these
18:58
sides of the trunk I'm going to build
18:59
like fiberglass walls if you will that
19:03
will curve and they'll be symmetrical
19:06
and then I'll do you know I've got to do
19:07
the spare tire area the floor so I might
19:10
start mocking that stuff up next and
19:12
that gives me kind of the general
19:15
overall shape and and you know uh form
19:19
of the trunk itself then I can go
19:21
through every piece and then do the
19:22
detail so if I do these next it'll be
19:26
they'll just be fiberglass ready to a
19:28
poster um there's some cool things that
19:30
I'm working on for these two side panels
19:33
Earl had a really really cool idea it's
19:35
subtle but it's going to be it's going
19:37
to be like the cherry on top and I'll
19:39
talk more about that you'll that'll be a
19:40
surprise you'll see that when that comes
19:42
so um that's going to be it for this
19:44
video I know it's a short one I'll go
19:46
ahead and close this out thank you very
19:49
much for watching I appreciate um any
19:51
support and in uh encouragement it can
19:54
be uh lonely and long uh nights here in
19:57
the garage but uh it's starting to
19:59
become really worth it I'm seeing the
20:01
fruits of the labor and I'm really
20:03
excited so uh if you have not yet I
20:06
would appreciate it if you subscribe
20:08
like the video and tell your friends
20:10
thank you very much I will talk to you
20:11
soon
20:12
bye-bye
This website stores cookies on your computer. These cookies are used to provide a more personalized experience and to track your whereabouts around our website in compliance with the European General Data Protection Regulation. If you decide to to opt-out of any future tracking, a cookie will be setup in your browser to remember this choice for one year.